

Tasks’ permissions in Nintex Workflow for Office 365
Table of contents:
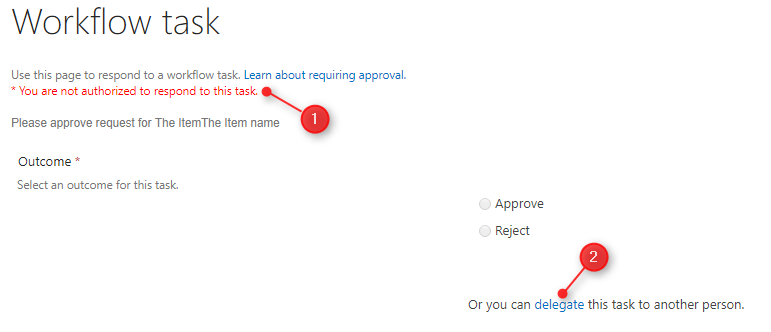
In Nintex Workflow for SharePoint (every version), when you use the “Flexi task” action, that creates and assigns tasks to specific users, if you (as a viewer) are not the assignee, workflow tells you that “You are not authorized to respond to this task.” – then to make yourself authorized you have to click the “delegate” link, then to reassign that task to yourself.
One of the requirement, which is mandatory to allow the assignee taking part in approval processes, is having the “Contribute” permission (source) on “Workflow Tasks” and “Workflow History” list (well, at least contribute on the task he is supposed to approve or reject :)).
Basically it means, that whoever has “Contribute” permissions can approve or reject any, existing task. Moreover, in the “Workflow History” will be no trace, that other person approved, the only place such information is stored is that specific task’s versions history. So the mechanism was rather a “must”.
What about Nintex for Office 365?
In Nintex Workflow for Office 365 permissions must be the same, however there is no mechanism (maybe it will be created one day: UserVoice), which would prevent other, than assigned, users from approving. What a pity! But hey, don’t loose your hope, there are possible workarounds:
Workflow on a Workflow Tasks list
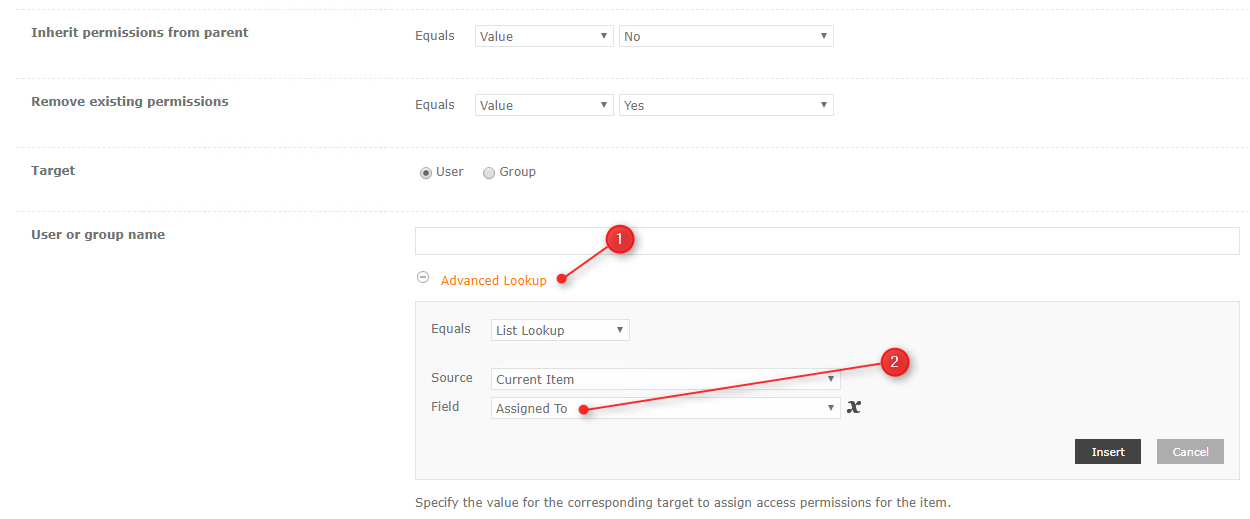
This is, in my opinion, is the easiest and the most secure way to ensure, that only the assigned person will approve or reject. What you need to do, is to create a workflow on a Workflow Tasks list, that for each created item will check, who the “Assigned To” is and then, using the “Office 365 Update Item Permissions” action, will break permissions’ inheritance on that item and remove the existing permissions, setting only the “Assigned To” as the user having “Contribute” permissions (just remember about the threshold).
[tds_info] Remember to put that action in “Action Set” having “Elevated permissions” set, to ensure permissions are set without error.[/tds_info]
 It can as well ad administrators (or controllers) group, to ensure, that in case that specific user is unavailable, someone else, but authorized, will complete the task.
Set tasks permissions using the related item’s workflow
But what in case, you would like to assign different authorized groups and users, regarding workflow related circumstances, rather then just setting permissions for assignee?
[tds_info] Update, 13.10.2017: Unfortunately you cannot use the new functionality added to Nintex for Office 365 in October, allowing you to get a collection of tasks’ IDs generated by the “Start a task process” action (source) as the collection is filled with information only after the action is completed :([/tds_info]
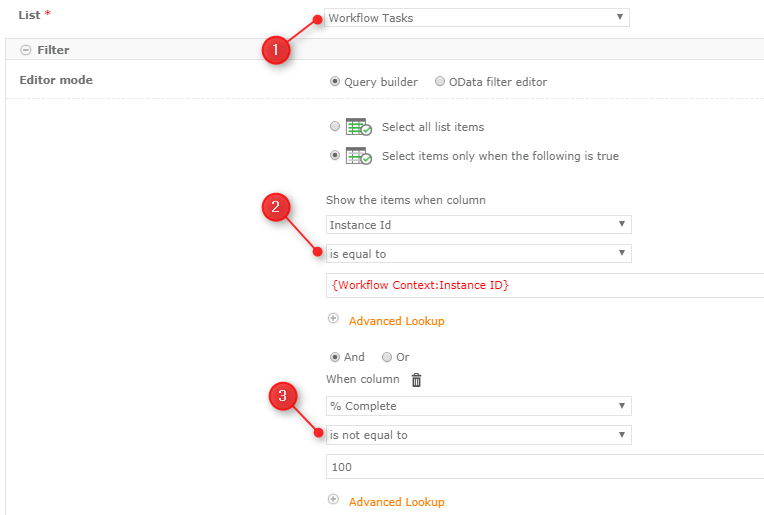
To achieve that, you need to use the “Query List” action, querying Workflow Tasks list, setting a filter: Instance Id is equal to {Workflow Context:Instance Id}.(I am also adding the “Completed not equal to 100, so that in return I will be getting only the open tasks):
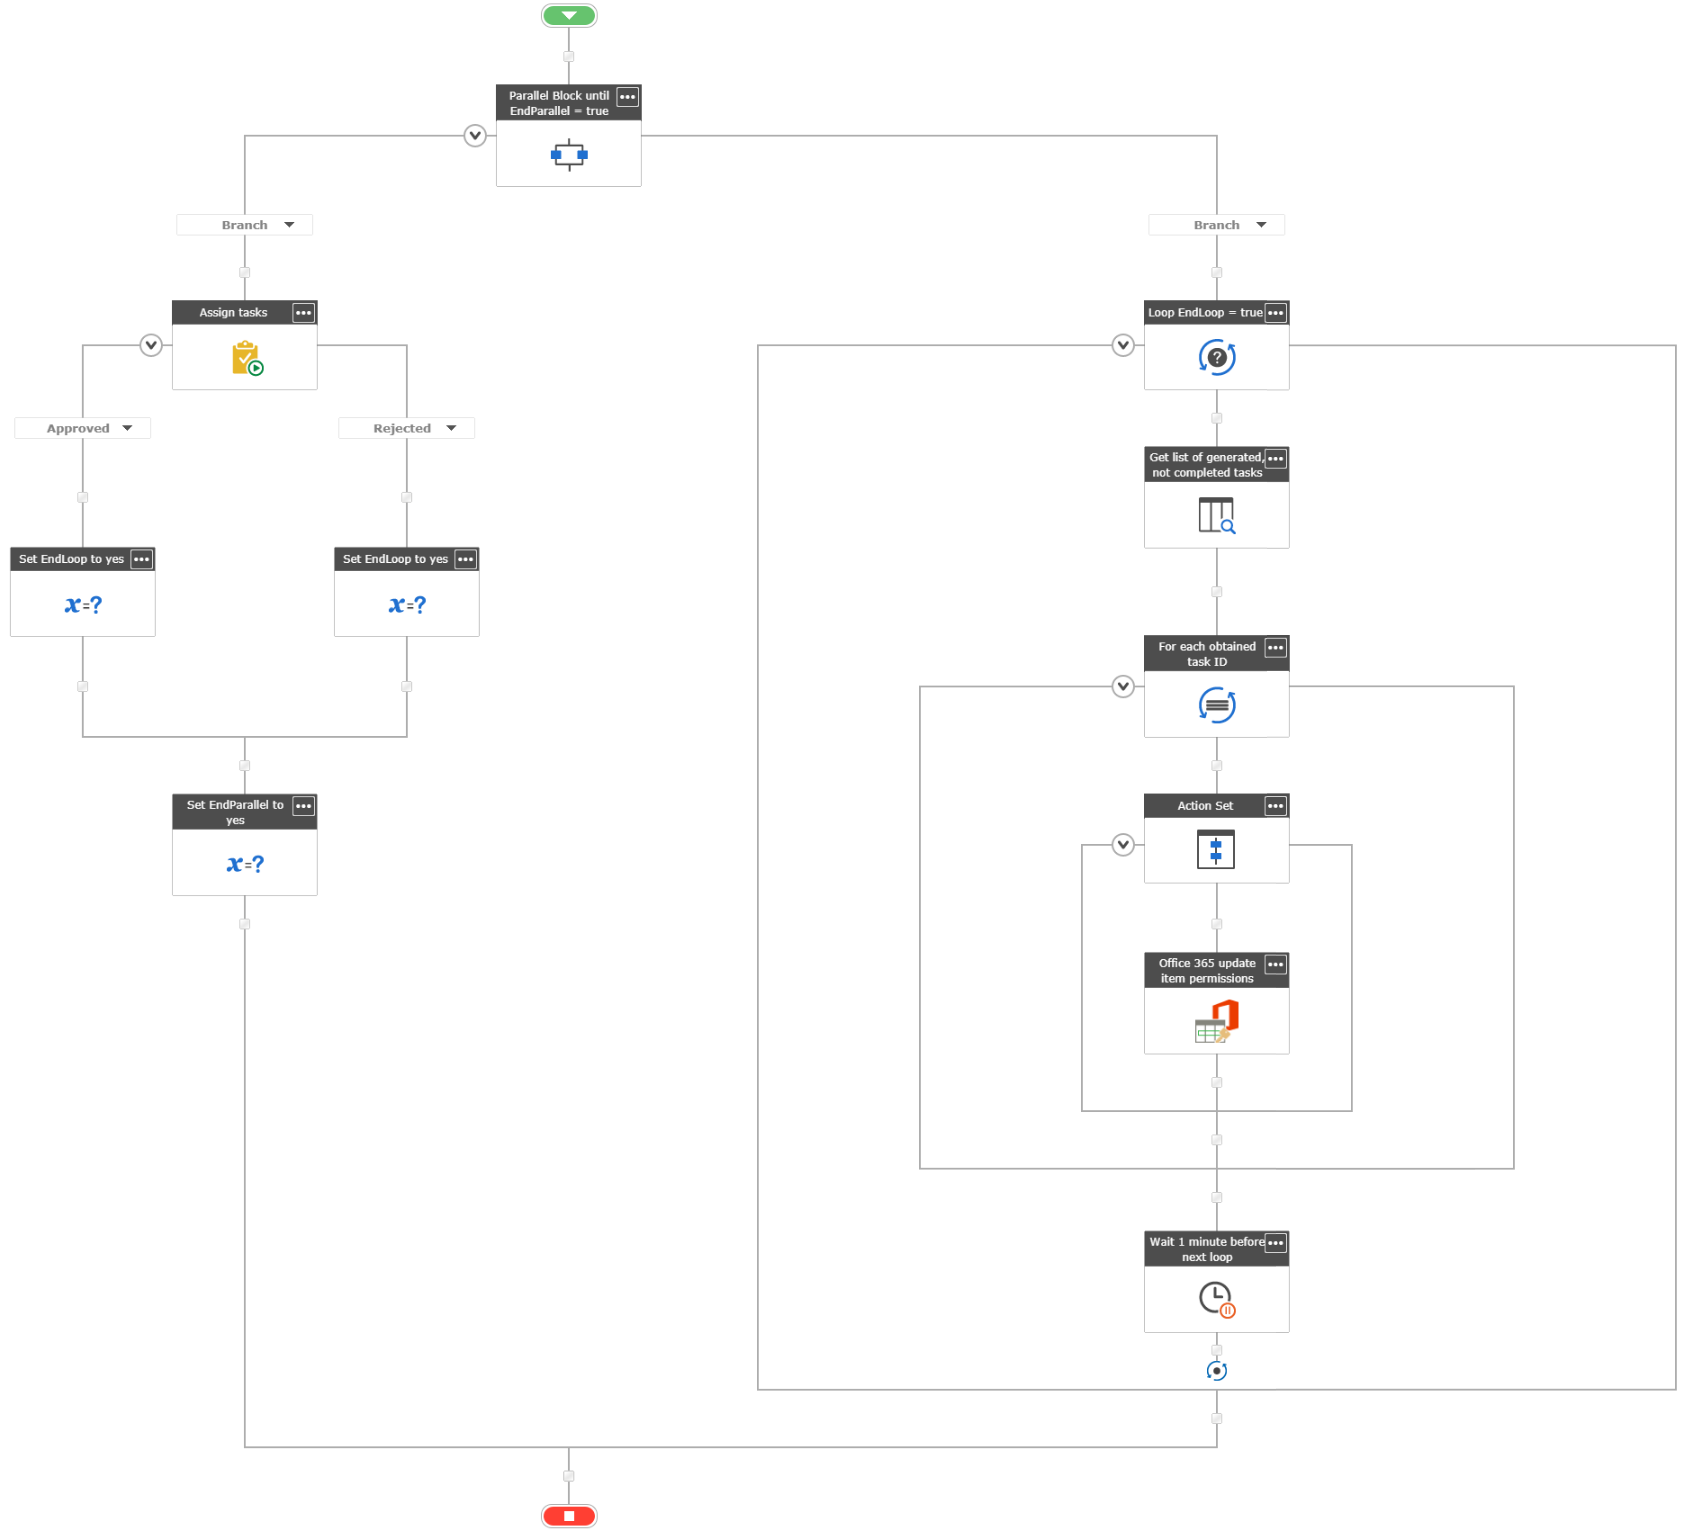
Because, when the workflow starts the task action, it pauses there, until the “Completion Criteria” are met. So to simultaneously handle approvals and set tasks’ permissions, you need to use the “Parallel Branch” action.
In the second branch you need to:
- loop as long, as the task is not complete and
- in each loop query the Workflow Tasks list
- in each run, iterate a collection of returned tasks’ IDs,
- then for each task ID set specific permissions
[tds_info] Of course put that action in “Action Set” having “Elevated permissions” set, to ensure permissions are set without error.[/tds_info] - After each run pause it for a minute, so your loop will not kill your tenant 😉
This approach, although working, has its weakness: the task may exists for some time before is processed and it’s permissions are set, the “pause” action sometimes not un-pauses within the specified time, and so on, however you have more control over whom and based on what rules you want to grant permissions, as you do have access to the item itself, and more important – to the item’s form.
Create a custom JavaScript
You can as well create a custom JavaScript and then inject it using the “Script Editor” web part above the Task web part (in my case this is a HTML page injected using the “Content Editor” web part). The code can simply check, if the current user is the one, who is the Assigned To, and in case not – handle specific exceptions. The code below does it, then if realizes that current user is not the permitted one, simply allows him to reassign the task to someone else, but removes all action buttons from the DOM, so even removing the overlay won’t allow bypassing that protection:
<style type="text/css">

    #overlay {
        position: absolute;
        display: block;
        width: 100%;
        height: 100%;
        top: 0;
        left: 0;
        right: 0;
        bottom: 0;
        background-color: rgba(255, 255, 255, 0.5);
        z-index: 1000;
        cursor: not-allowed;
    }

    #overlay > p {
        position: absolute;
        top: 25%;
        transform: translateY(-50%);
        font-size: 24px;
        text-align: center;
        background-color: #fff;
        width: 100%
    }

</style>

<script type="text/javascript" src="https://code.jquery.com/jquery-2.2.4.min.js"></script>
<script type="text/javascript">
    jQuery.noConflict();
    var currentUserId = _spPageContextInfo.userId;
    var assignedToId;

    Sys.WebForms.PageRequestManager.getInstance().add_pageLoaded(CheckIfAssignedTo);

    // hide form controls as fast, as they appear
    jQuery(function () {
        jQuery("div.ms-webpart-zone.ms-fullWidth").find("input[type='button']").each(function () { if (jQuery(this).val() !== "Cancel") jQuery(this).attr("style", "display:none"); });
        jQuery("a[id='Ribbon.ListForm.Edit.Commit.Publish-Large']").attr("style", "display:none");
        jQuery("li[id='Ribbon.ListForm.Edit.Clipboard']").attr("style", "display:none");
        jQuery("li[id='Ribbon.ListForm.Edit.Actions']").attr("style", "display:none");
    });

    function CheckIfAssignedTo() {

        // read current users' ID, try - for the displayForm, catch - for the editForm.
        try {
            assignedToId = ((jQuery("#SPFieldUserMulti").find("a[class='ms-peopleux-userdisplink ms-subtleLink']").attr("href")).match(/ID=(\d*)/))[1];
            processDisplayForm();
        }
        catch (e) {
            assignedToId = (JSON.parse(jQuery("input[id^='AssignedTo_']").val()))[0].EntityData.SPUserID;
            processEditForm();
        }

        console.log(assignedToId + " !== " + currentUserId);
    }

    function processEditForm() {
        // if current user is not the AssignedTo - remove controls from the form and display overlay.
        if (currentUserId != assignedToId) {
            jQuery.when(
                jQuery(jQuery("div.ms-webpart-zone.ms-fullWidth").attr("style", "position:relative;")).append("<div id=\"overlay\">" +
                    "<p>You are not allowed to response to this task.<br><a href=\"#reassign\">Please reassign it!</a></p>")
            )
                .done(function () {
                    jQuery("li[id='Ribbon.ListForm.Edit.Clipboard']").remove();
                    jQuery("li[id='Ribbon.ListForm.Edit.Actions']").remove();

                    jQuery('a[href="#reassign"]').click(function () {
                        jQuery("table[class='ms-formtable'] > tbody > tr").each(function () {

                            if ((jQuery(this).closest('tr').children('td:first').text()).trim() !== "Assigned To") jQuery(this).remove();
                            jQuery("a[id='Ribbon.ListForm.Edit.Commit.Publish-Large']").attr("style", "display:inline-block");
                            jQuery("div.ms-webpart-zone.ms-fullWidth").find("input[type='button']").each(function () { if (jQuery(this).val() === "Save") jQuery(this).attr("style", "display:block"); });
                            jQuery("#overlay").hide();

                        });
                    });

                });

        }
        // if current user is the AssignedTo - bring back all the form functionality
        else {
            jQuery("div.ms-webpart-zone.ms-fullWidth").find("input[type='button']").each(function () { if (jQuery(this).val() !== "Cancel") jQuery(this).attr("style", "display:block"); });
            jQuery("a[id='Ribbon.ListForm.Edit.Commit.Publish-Large']").attr("style", "display:inline-block");
            jQuery("li[id='Ribbon.ListForm.Edit.Clipboard']").attr("style", "display:inline-block");
            jQuery("li[id='Ribbon.ListForm.Edit.Actions']").attr("style", "display:inline-blocka");
        }
    }

    function processDisplayForm() {


    }

</script>
You can as well create a different behavior for the View and Edit Form – whatever you need. This is just the basic solution, but helps to handle the basic requirements:
Create list views using filters
The last, but not much secure way to give users access to only their tasks, is to create a default view, which is having the filter set to “AssignedTo is equal to [Me]”. Once user enters such created tasks list, he will see only tasks assigned to him. E-mail communication around the workflow also informs him only about the tasks assigned to him, so basically, if this is not a junior hacker, trying to break your system, will never figure out that there are more tasks, he can work with 🙂
Final note
Whichever approach you will choose be sure that it is accepted by your stakeholders and within the security procedures of your company. Check, whether the process is critical and thus it requires only specific users to be authorized or maybe it is not, and a simple list view is enough to fulfill the requirements.
Maybe you have your verified approach, that you are using, and is something different then the described above? Tell me about it! Leave a comment below 🙂


Shanaka
This is a great post Tomasz.
Tomasz Poszytek
Thank you.
Santiago Gomez
Excellent breakdown of task security approaches. Thank you!
Santhosh
Hi @Tomasz
I am trying to implement the first solution you have mentioned. ie. a workflow in the Task list, that will get triggered when an item is created (This item is created due to “Start a task process” action in another WF).
I also bumped into this link: https://community.nintex.com/t5/Nintex-for-Office-365/Workflow-not-Starting-on-ItemCreated/td-p/7228/page/2
Whats your thoughts on this?
Thanks in advance
Tomasz Poszytek
Maybe the item in your case is not created by a user, but by system account? You want to trigger a workflow for a created task? Tasks are generated by workflow, so the system account and as such they don’t match the “when new item is created” trigger rules. As a workaround you can follow my steps, so to have parallel branch, in one assign a task, in other query tasks’ list and ie. trigger workflow for specific item(s).
Santhosh
Sorry just to be clear, it appears that a task created via a WF would not trigger Item Created event in Office 365. have you come across this issue?
Tomasz Poszytek
As I wrote in previous answer. It won’t because it is created by system account. So you need to trigger it manually. For example using the approach from the post, with the parallel branch.
Santhosh
Thanks @Tomasz, our comments crossed each other. I get your point. I will try the second approach you mentioned.