

Provisioning SharePoint Online list using another one as a template
Table of contents:
In this blog post I would like to share with you a cool solution I have recently built for my customer, that allows dynamic creation of lists based on existing templates, together with setting all needed metadata and permissions.
Brief intro to requirements
Customer has a process, that processes incoming XML files and then saves data from them into related SharePoint lists. However, the idea of pre-provisioning dozens of lists is bad. Moreover, there can always be a case, where the list for a given metadata is not yet provisioned. For that reason, I decided to rather take a look at dynamic provisioning of lists.
How to create a list dynamically?
The major challenge was to find a smart way to provision new list dynamically. I needed a solution, that would allow business users to self-manage templates in a flexible, easy way.
First, I was trying to use site scripts with site designs – but that would not be the perfect solution, as every change to list template would require an admin to create new design and then update the registered one.
Next, I was thinking about some kind of configuration list, where all columns and views would be somehow defined and a flow, that would create a list and then columns one-by-one, but… really? There must be an easier way 😉
Finally, I decided to investigate what happens when a new list is created using the existing one via the actions available in the SPO interface.
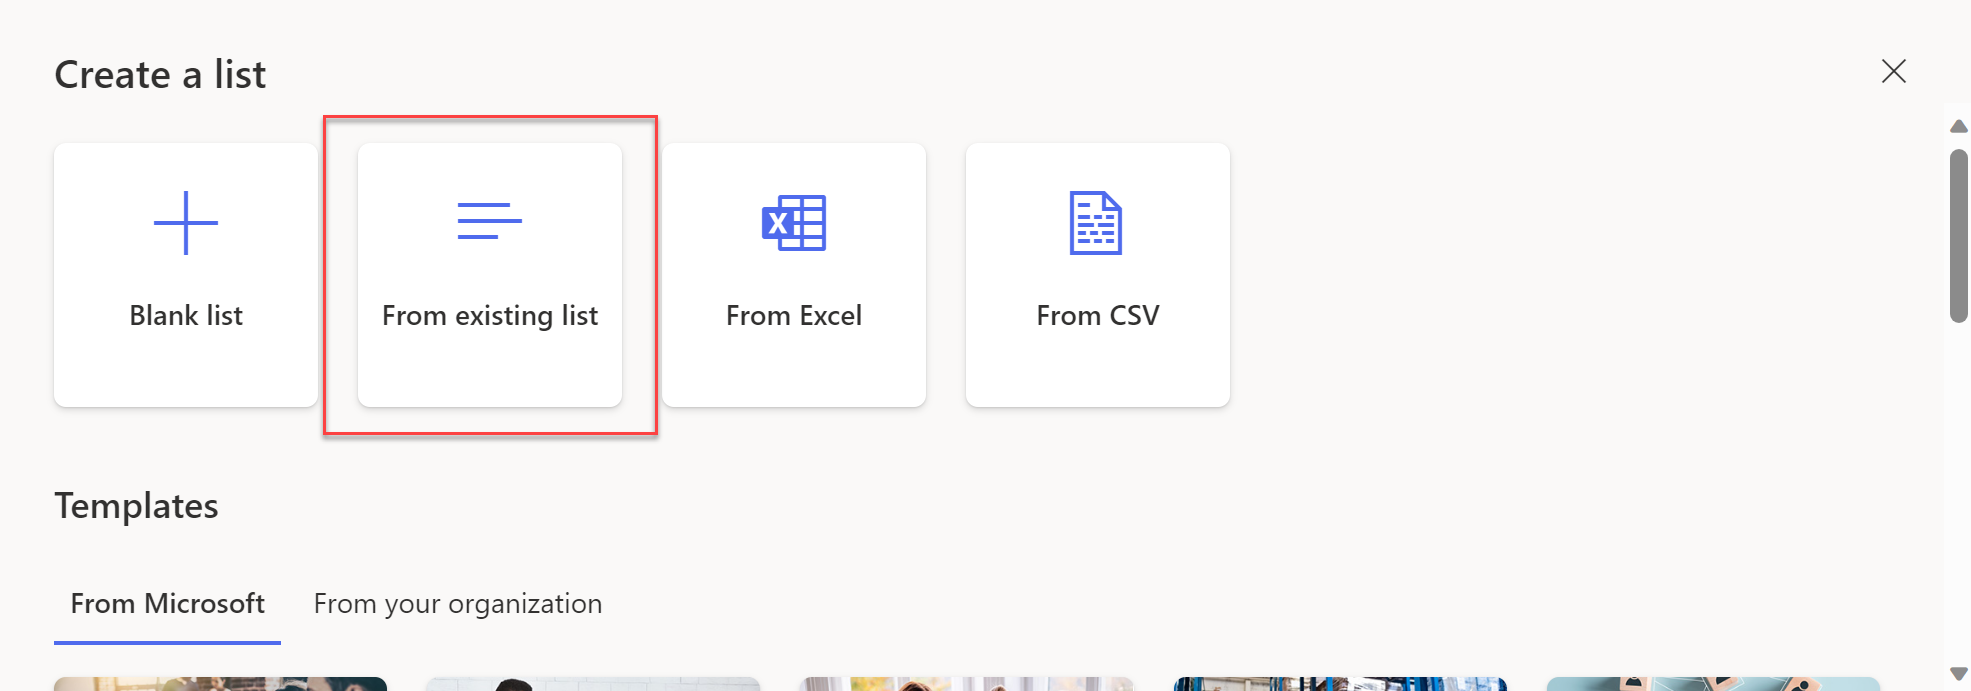
I thought that there must be an endpoint for that, however I was not able to find it in any Microsoft docs. Googling I found this wonderful post (Create new SharePoint list from existing SP list with Power Automate (tomriha.com)) by Tomáš Říha, where he explained how he was able to obtain endpoint URL and schema of request body by using developer tools in a browser. I have followed the described steps, previewed the requests being sent when creating a new list from an existing one and voilla!
This works like a charm. And that was a breakthrough. All the rest was pretty easy!
Process steps
The steps to provision a new list are as following:
- Find an existing template list (existing SPO list with all column, views, formatting etc…), and get its site script,
- Modify the site script to change new list’s name and it’s visibility in navigation,
- Provision new list,
- Set its unique permissions.
Step 1 – find a template and get site script
First using the endpoint described in Microsoft docs (SharePoint site design REST API | Microsoft Learn) process is retrieving the site script of a list. The endpoint is the following (source: https://learn.microsoft.com/en-us/sharepoint/dev/declarative-customization/site-design-rest-api#getsitescriptfromlist).
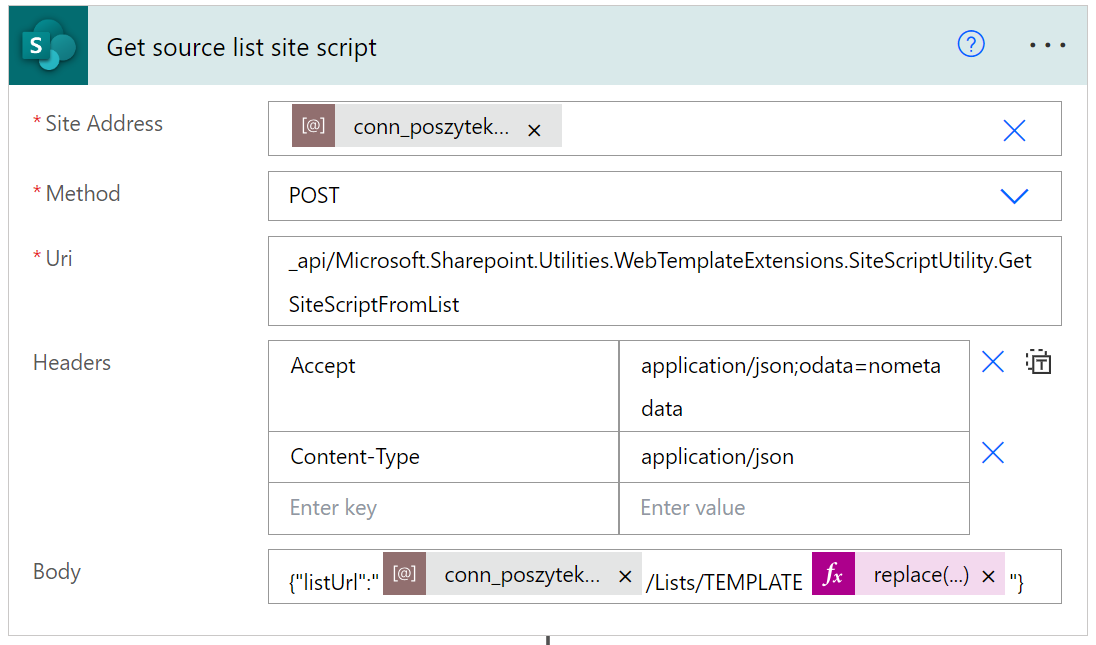
The endpoint URL is:_api/Microsoft.Sharepoint.Utilities.WebTemplateExtensions.SiteScriptUtility.GetSiteScriptFromListThe request body:{"listUrl":"ABSOLUTE_URL_TO_SOURCE_LIST"}
Using the “Send HTTP request to SharePoint” the process is making a GET request and in return receives a JSON, that then it parses to retrieve the actual site script from it:
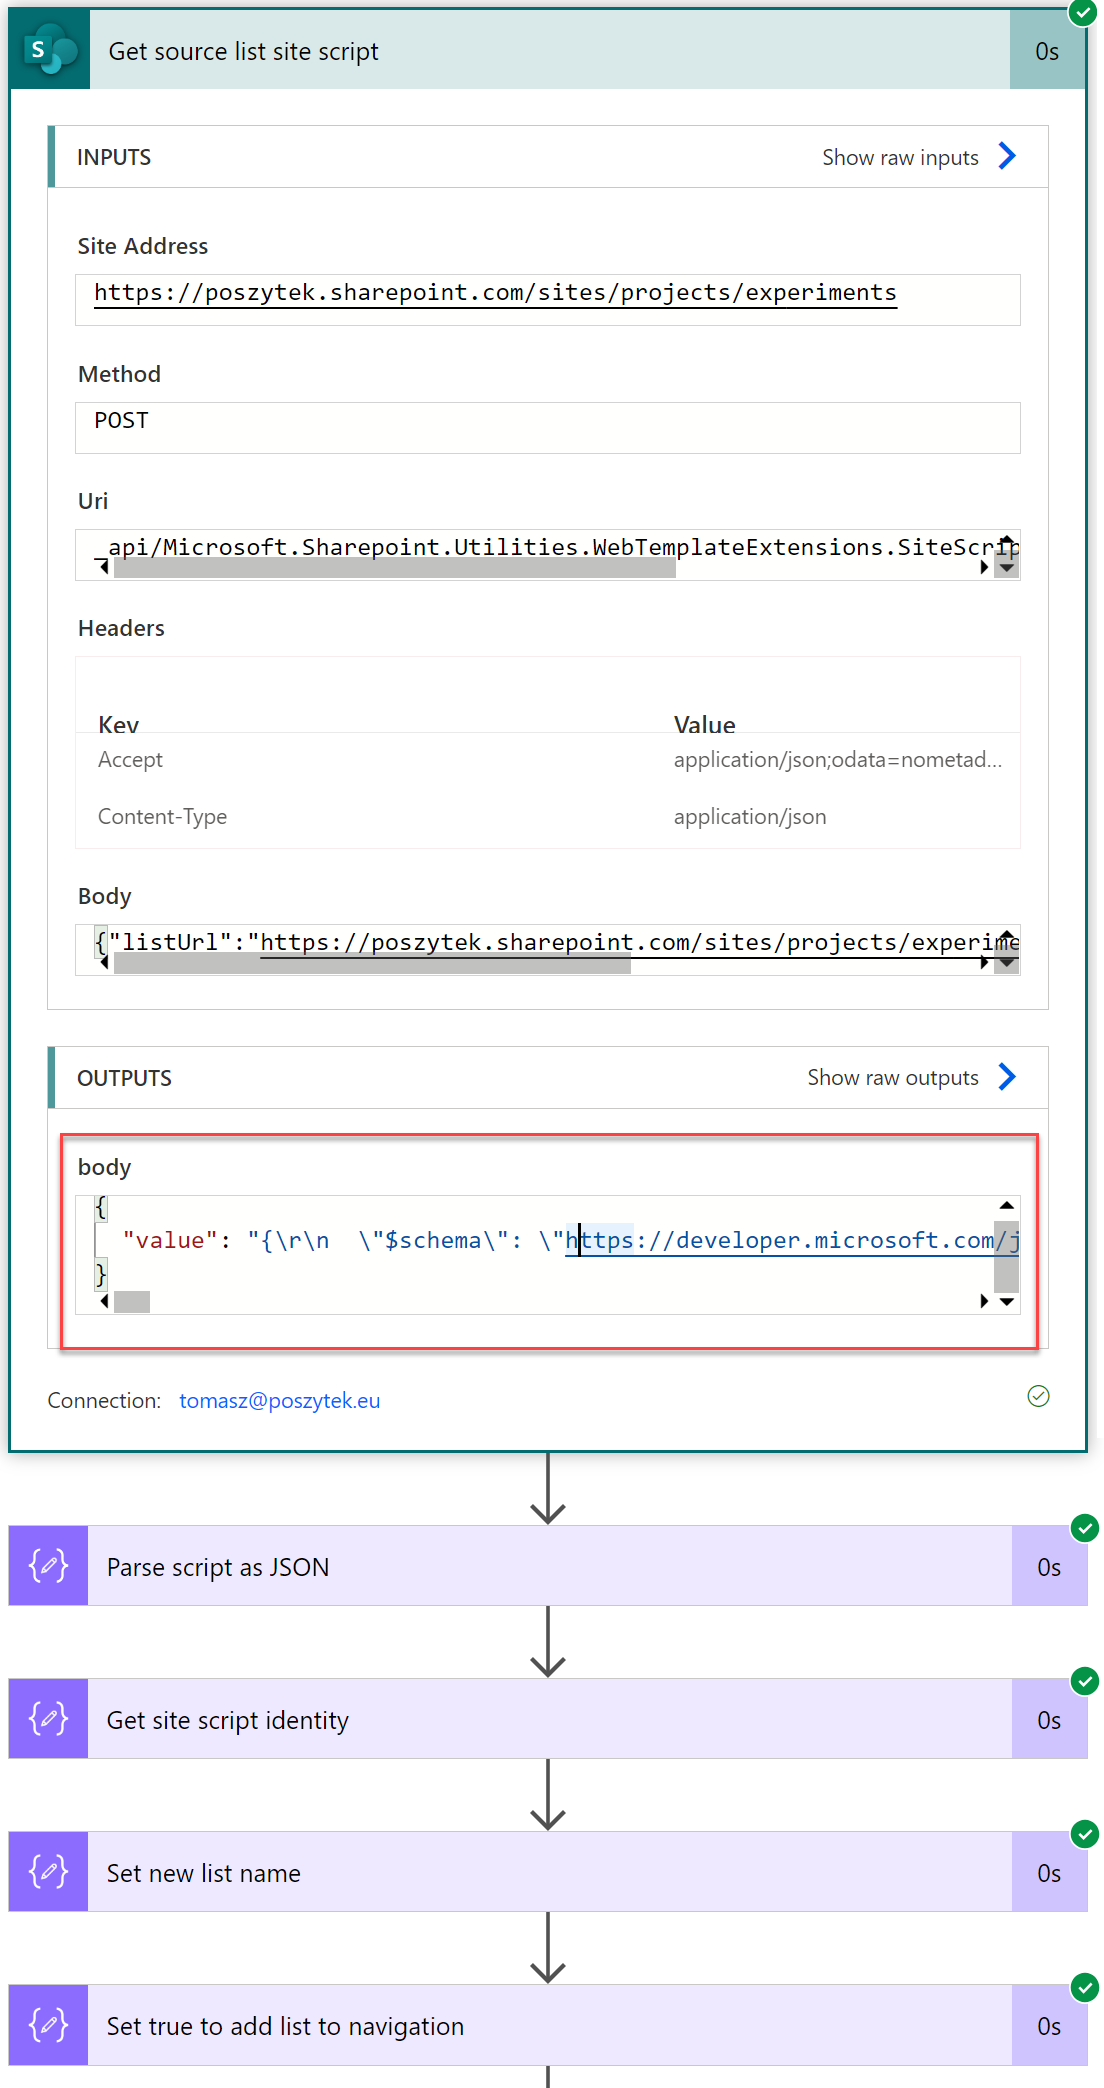
The site script has the following structure:
{
    "$schema": "https://developer.microsoft.com/json-schemas/sp/site-design-script-actions.schema.json",
    "actions": [
        {
            "verb": "createSPList",
            "listName": "[[LInvoices_approvals_T0001_listName]]",
            "templateType": 100,
            "color": "[[LInvoices_approvals_T0001_color]]",
            "icon": "[[LInvoices_approvals_T0001_icon]]",
            "addNavLink": "[[LInvoices_approvals_T0001_addNavLink]]",
            "description": "[[LInvoices_approvals_T0001_description]]",
            "identity": "LInvoices_approvals_T0001",
            "subactions": [
                {
                    HERE YOU CAN FIND ALL ACTIONS TO CREATE COLUMNS, VIEWS, ADD FORMATTING ETC...
                }
            ]
        }
    ],
    "bindings": {
        "LInvoices_approvals_T0001_listName": {
            "source": "Input",
            "defaultValue": "Invoices approvals TEST"
        },
        "LInvoices_approvals_T0001_icon": {
            "source": "Input",
            "defaultValue": "8"
        },
        "LInvoices_approvals_T0001_description": {
            "source": "Input",
            "defaultValue": ""
        },
        "LInvoices_approvals_T0001_color": {
            "source": "Input",
            "defaultValue": "5"
        },
        "LInvoices_approvals_T0001_addNavLink": {
            "source": "Input",
            "defaultValue": "false"
        }
    }
}IMAGE
Step 2 – Modify the site script
The very important step is to extract the site script identity – this is a postfix that is appended to every attribute within the JSON, that is unique and required to be able to reach out to any attribute using path. In the example above it is: LInvoices_approvals_T0001. Then using the setProperty expression the process is changing the title of the new list, that is kept under the “bindings” property. It is done by using the below expression.
First: first(body('Parse_script_as_JSON')?['actions'])?['identity'] to get script identity.
And then: setProperty(body('Parse_script_as_JSON'), 'bindings', setProperty(body('Parse_script_as_JSON')?['bindings'], concat(first(body('Parse_script_as_JSON')?['actions'])?['identity'], '_listName'), setProperty(body('Parse_script_as_JSON')?['bindings']?[concat(first(body('Parse_script_as_JSON')?['actions'])?['identity'], '_listName')], 'defaultValue', 'New name'))) to set the actual, new name. The expression is quite long, as it requires the nested setProperty to update the listName in bindings.
Note! It is very important to remember, that setProperty is able to reach just one level below the given attribute. Thus if you need to manipulate an attribute that is really deep in the JSON’s structure, you need to invoke setProperty per each level (nested setProperty), as in my example above (Reference guide for expression functions – Azure Logic Apps | Microsoft Learn).
Next, using the similar setProperty expression the process sets the flag to add list to site navigation.
Step 3 – provision the new list
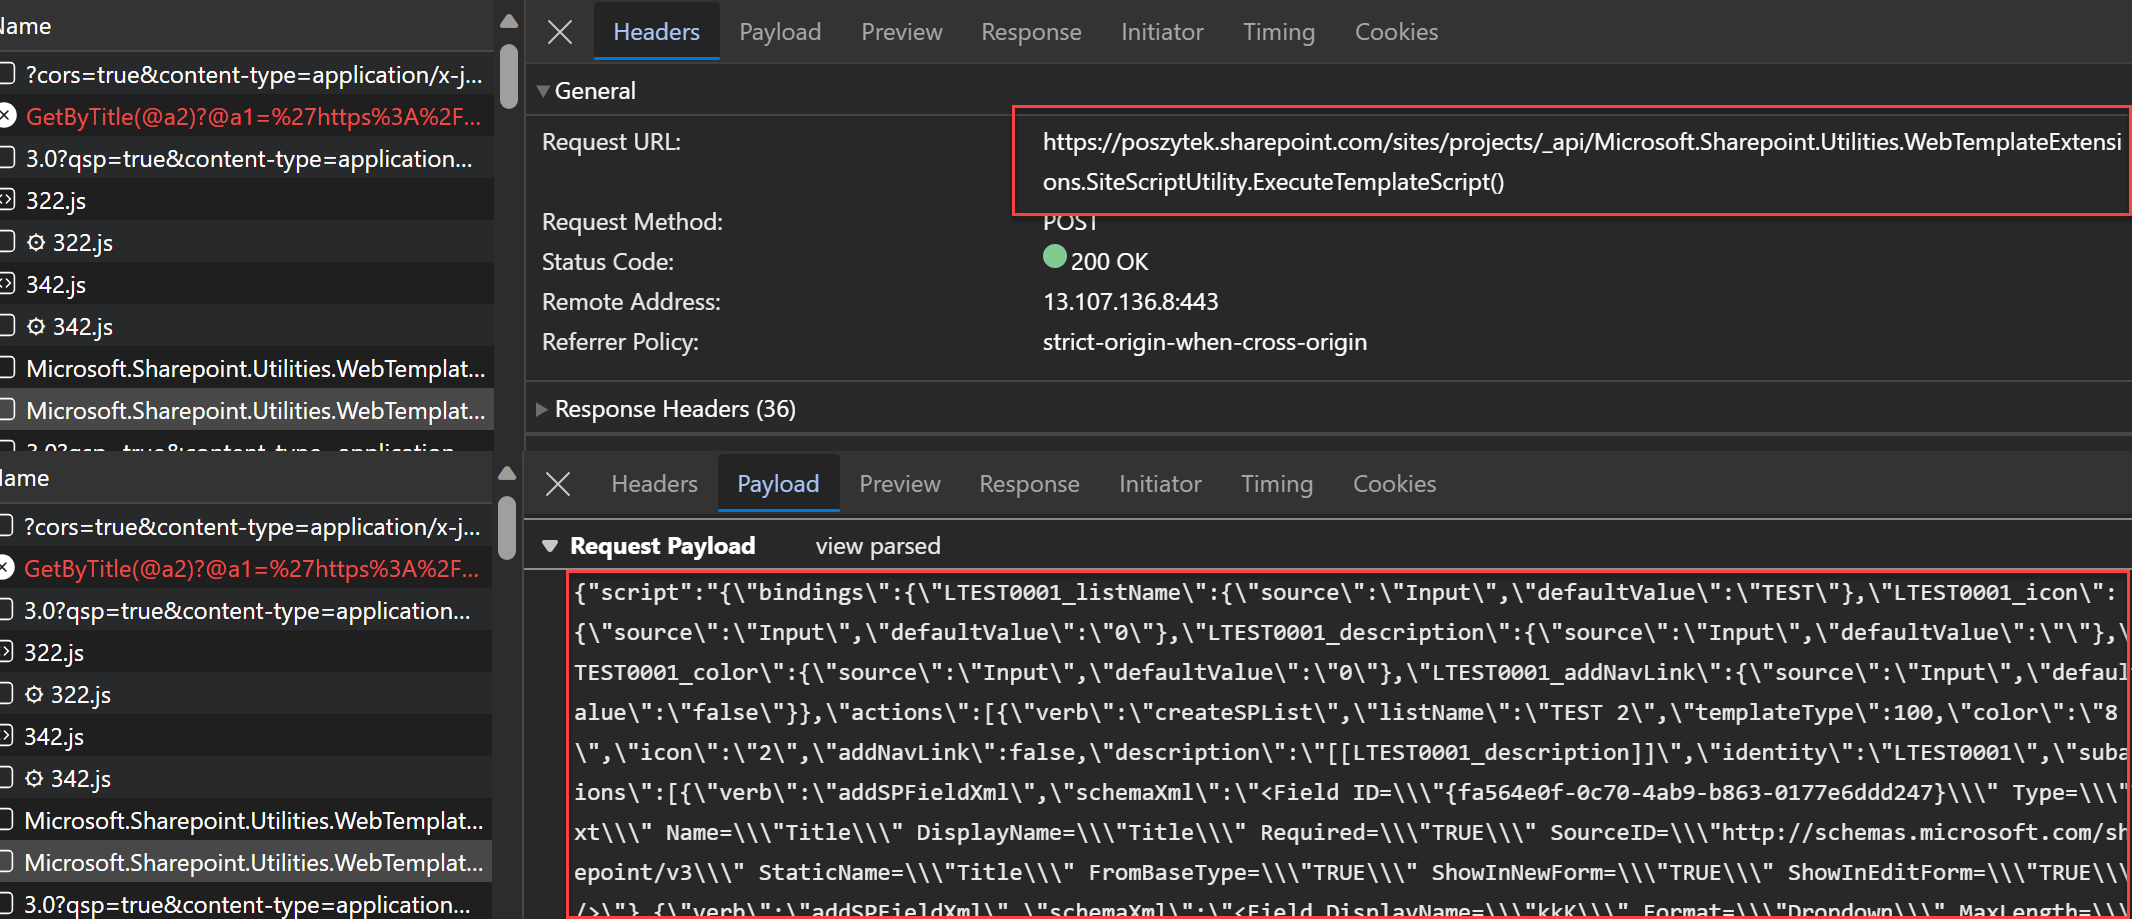
Using developer tools, as Tomáš Říha advised I retrieved the endpoint URL and the request body schema. However, before the manipulated site script is posted, it has to be escaped for quotes – this is why every quote is escaped. I am doing that using the following expression: replace(replace(string(outputs('Set_true_to_add_list_to_navigation')), '"', '\"'), '\\', '\\\').
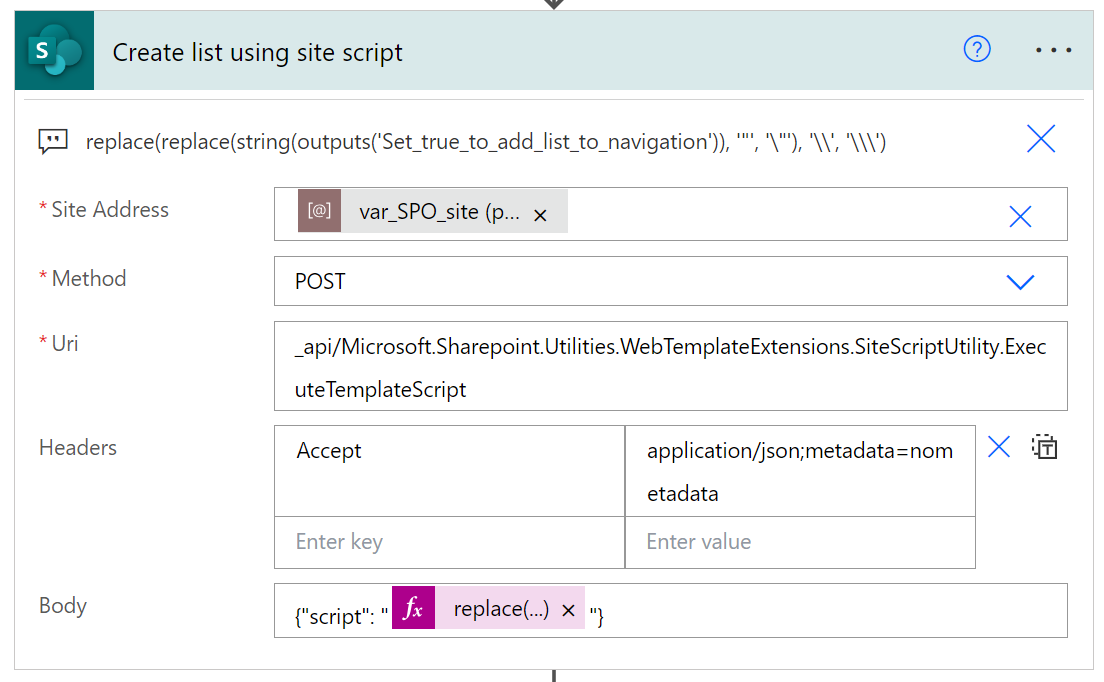
The endpoint URL is:_api/Microsoft.Sharepoint.Utilities.WebTemplateExtensions.SiteScriptUtility.ExecuteTemplateScriptThe request body:{"script": "SITE SCRIPT CONVERTED TO ESCAPED STRING"}
And that’s it. The list is provisioned within seconds. Note, how fast the process is executed without any really sophisticated logic. Well, maybe apart from the setProperty expressions 😉.
Step 4 – set list’s permissions
The endpoint to get/set permissions are very well documented in Microsoft docs (Set custom permissions on a list by using the REST interface | Microsoft Learn). The permissions manipulation is pretty straightforward, but because in my case lists are being provisioned dynamically, the SPO permissions’ group for the lists should also be, as they may not exist at the time of list creation. So here are the steps:
- Check if SPO permissions group exists,
- Create it if no, grant it read permissions to a site, set owner,
- Break permissions inheritance on the list,
- Get and remove all existing permissions,
- Grant permissions for the newly created group (and eventually some more).
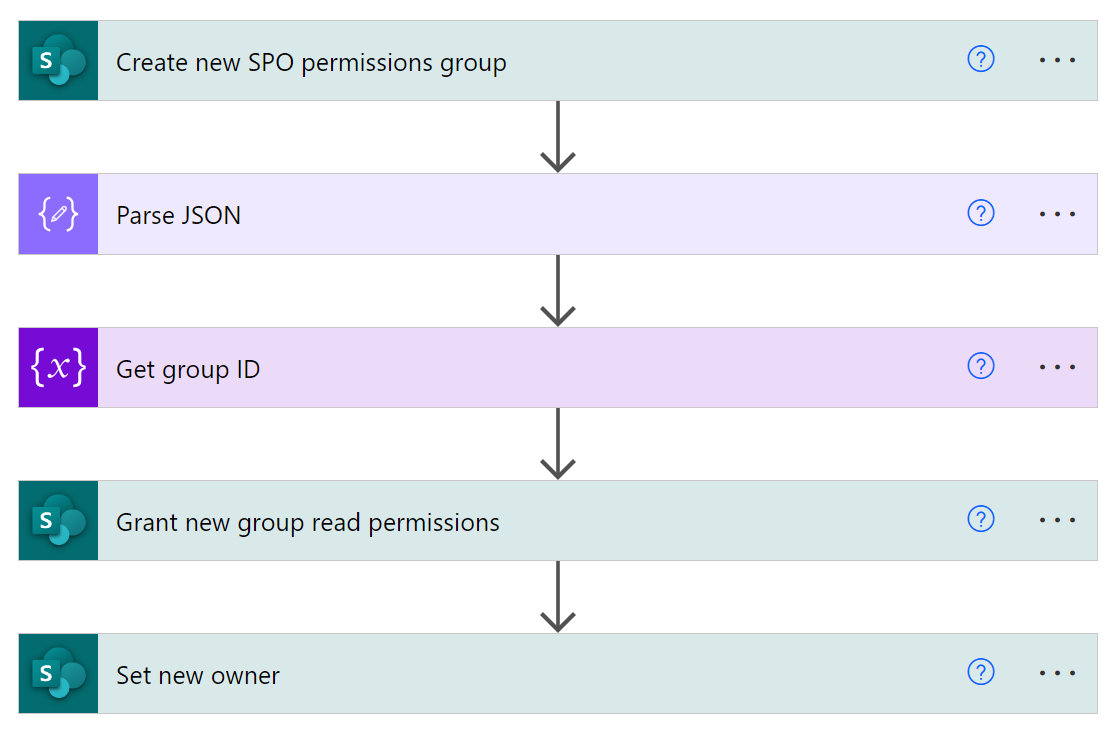
Steps a and b – check if group exists and create if not
First, process is calling the endpoint: _api/Web/SiteGroups/?$filter=Title eq 'GROUP NAME', to check if group exists. If it doesn’t, it then makes a POST to the endpoint: _api/Web/SiteGroups with the below request body:
{
    "__metadata": {
        "type": "SP.Group"
    },
    "Title": "GROUP NAME",
    "Description": ""
}
To create the group.
After it is created, it gets its ID and then set its permissions to the site making a POST request to the endpoint: _api/Web/RoleAssignments/addroleassignment(principalid={GROUP ID}?,roledefid=1073741826).
| Role identifier value | Role definition |
| 1073741825 | Guest |
| 1073741826 | Reader (Read) |
| 1073741827 | Contributor (Contribute) |
| 1073741828 | Web Designer |
| 1073741829 | Administrator (Full control) |
Note! As long as the group is not granted any permissions to a site, it won’t show up on the site’s list of permissions groups.
Finally, it is changing the owner of the group to a specific employee. This is done by placing the POST request to the endpoint: _api/web/sitegroups({GROUP ID})/SetUserAsOwner({USER ID FROM THE USERINFO LIST FROM THE SITE}).
What is important here is to acknowledge and accept the fact, there is literally no REST endpoint to set another group as the owner of newly created group. And won’t be (source: https://github.com/SharePoint/sp-dev-docs/issues/5031#issuecomment-594710013)! This can only be done via the SOAP request (source: https://github.com/pnp/pnpjs/issues/957#issuecomment-565484501).
Step c and d – break permissions inheritance and remove existing
Next using the endpoint: /_api/web/lists/getbytitle('LIST DISPLAY NAME')/breakroleinheritance(true), process breaks permissions’ inheritance on the list. Next using the endpoint: /_api/web/lists/getbytitle('LIST DISPLAY NAME')/roleassignments it gets all existing permissions, and then, in a loop (for each existing role assignment), it calls this endpoint: /_api/web/lists/getbytitle('LIST DISPLAY NAME')/roleassignments/getbyprincipalid('ROLE ID').
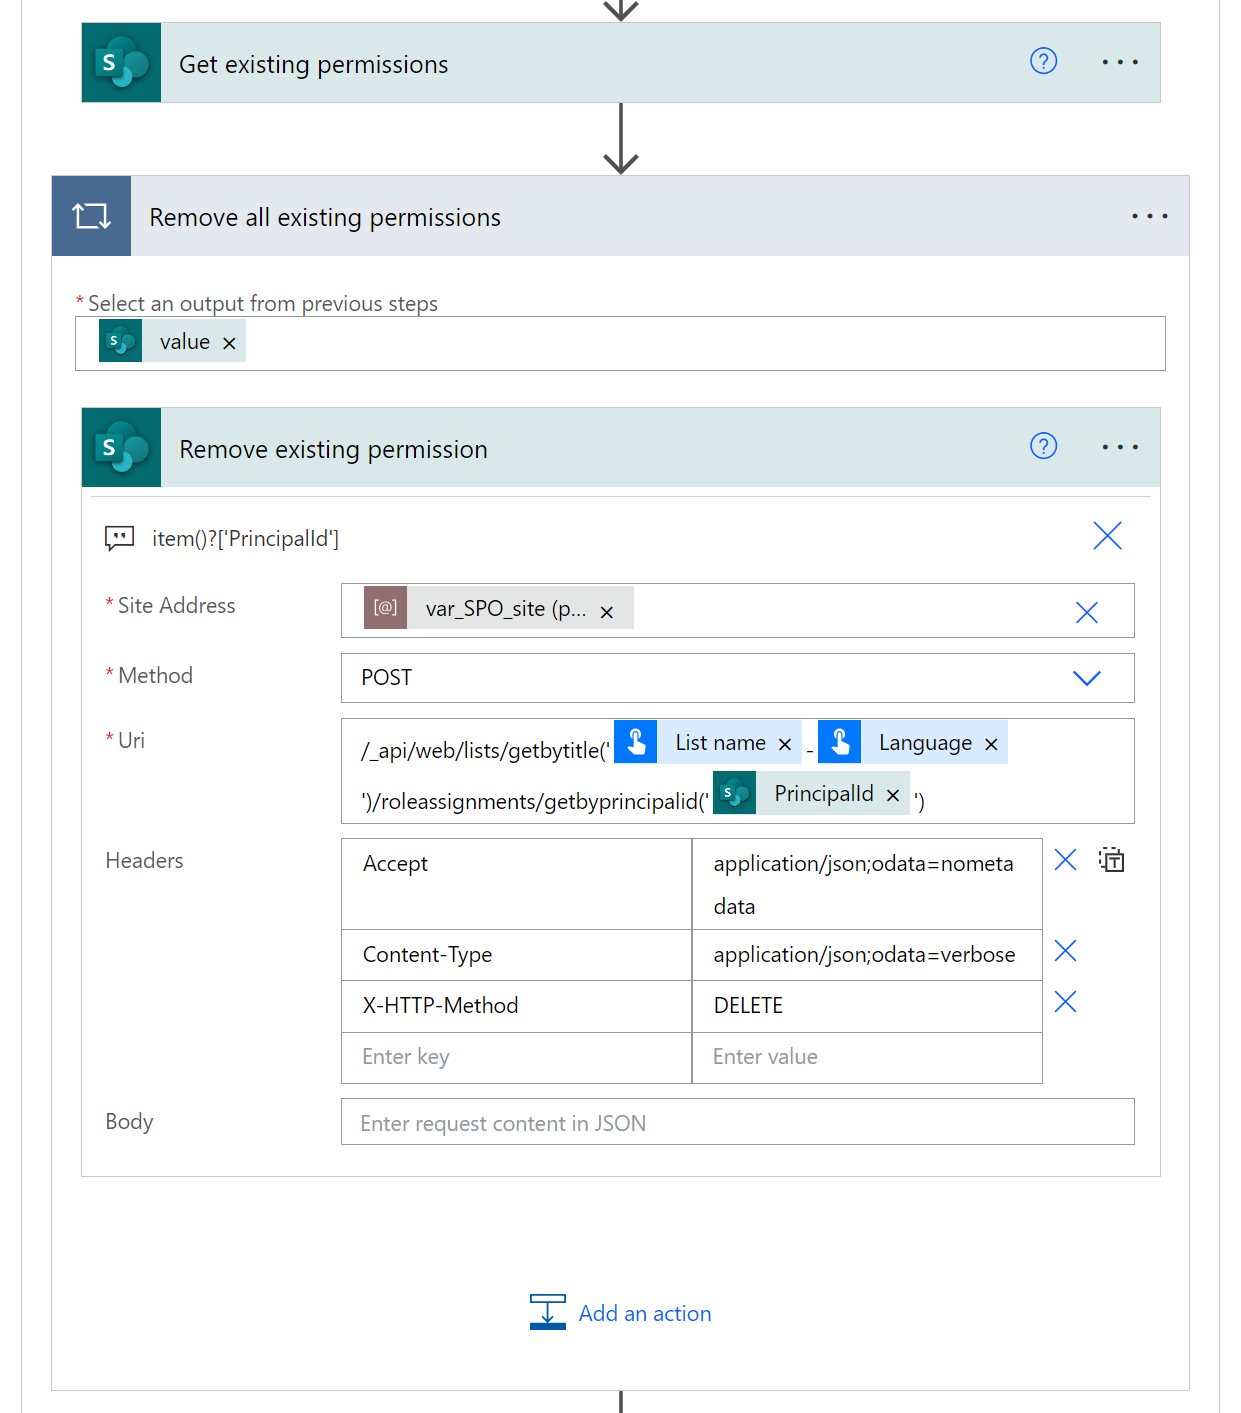
To remove each permission.
Important! Be sure, that the whole process uses a site administrator account to remove permissions, otherwise if it removes permissions for itself, no further steps will be possible.
Step e – grant new permissions
Finally, placing a POST request to the endpoint: /_api/web/lists/getbytitle('LIST DISPLAY NAME')/roleassignments/addroleassignment(principalid='GROUP ID',roledefid='1073741827').
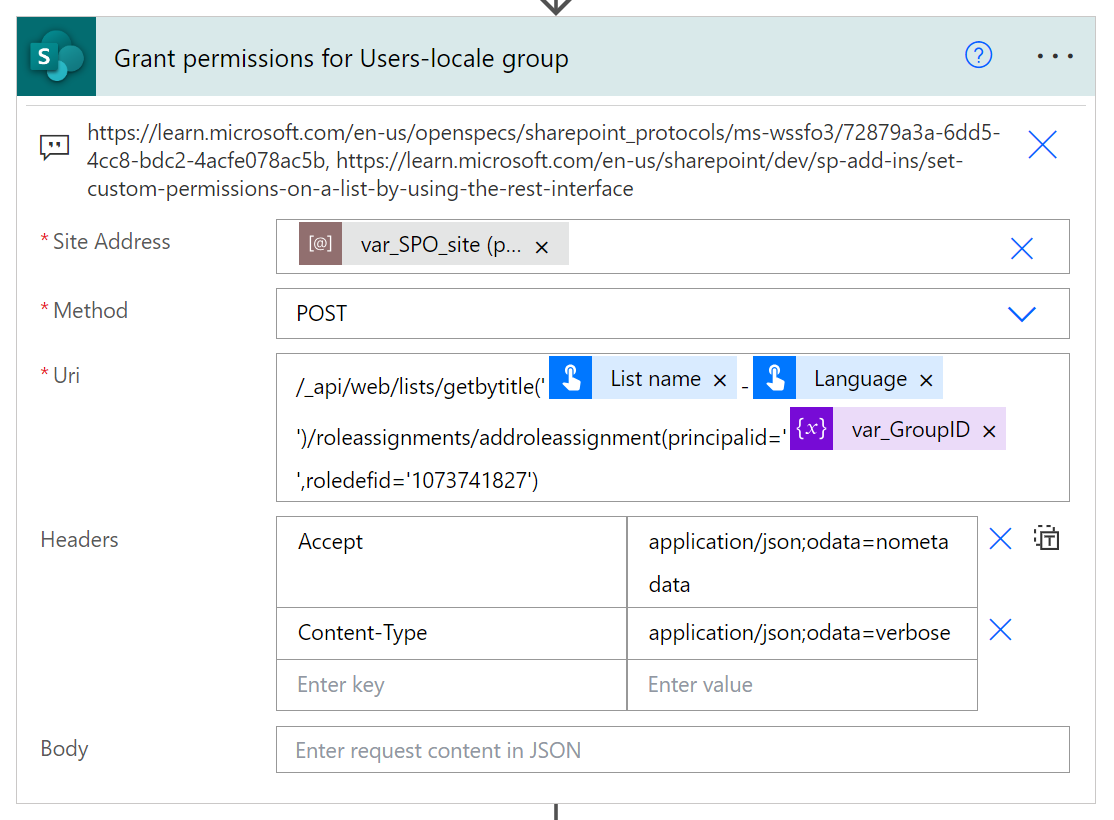
To grant permissions to the newly created group for the list.
Wrap up
And that’s it! This is how you can absolutely dynamically provision a new list, using an existing list as a template and then set its permissions. This approach is the best because it allows the business users to easily create new templates and manage existing ones, without any engagement from the IT. The process itself is very generic so that even if there is a new template needed, business can create it on their own. They just need to follow the naming convention, but nothing more than that.
I hope you will find it useful. I am personally very proud of this solution despite it took me couple of days to assemble it and make it work!