Independent Publisher connector step by step
Table of contents:
After I have successfully published and got certified with my first connector in the Independent Publisher connectors program (myStrom connector), I decided to share my journey and experiences with you, so that you can as well share your work with the whole world!
First of all it is not difficult! It does not require any programming and if you have ever created any custom connector for your own, you’re nearly there! So let’s do it together, step by step. Here’s also a video to help you better understand the steps you need to make:
1. Create custom connector
General information
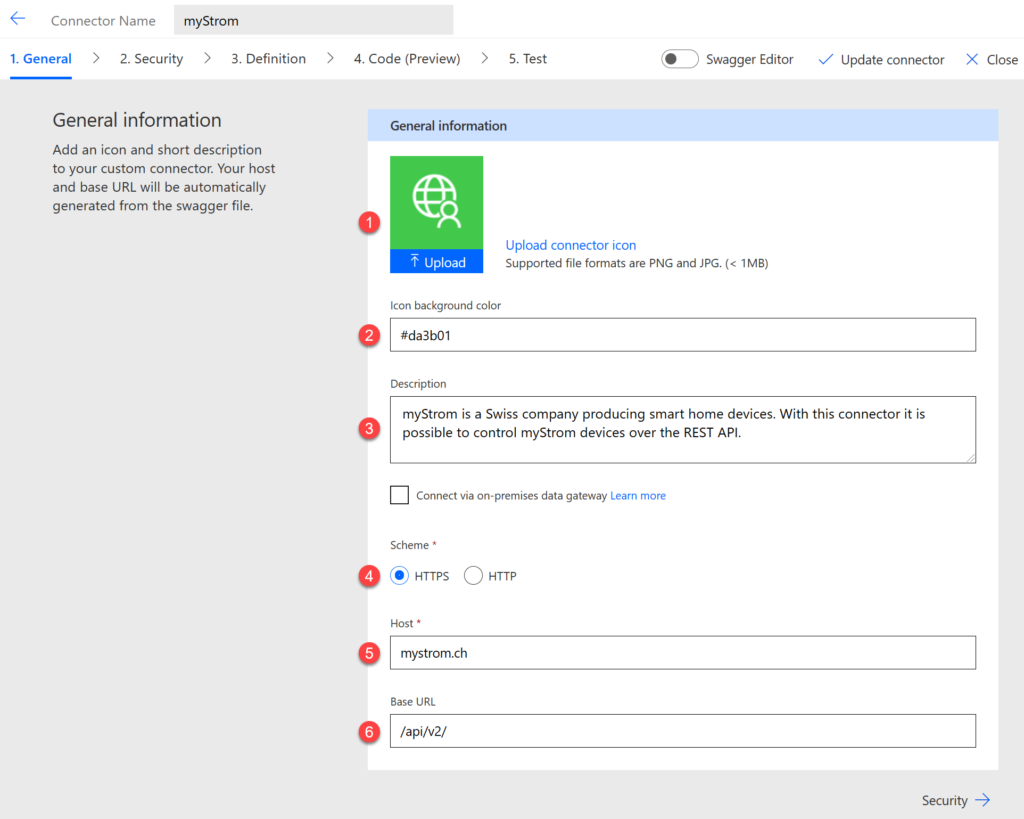
- Do not use any icon. It will be replaced by the default one.
- Use #da3b01 as the color
- Provide description for your connector. This is required.
- Choose type of connection
- Define host URL – that is the root URL for all API calls.
- Define base URL – that is after the root URL, but before all URLs defined for specific endpoints.
Security

Define what authentication is endpoint using. Define and configure of course 🙂
Definition
This is, where the fun part begins…
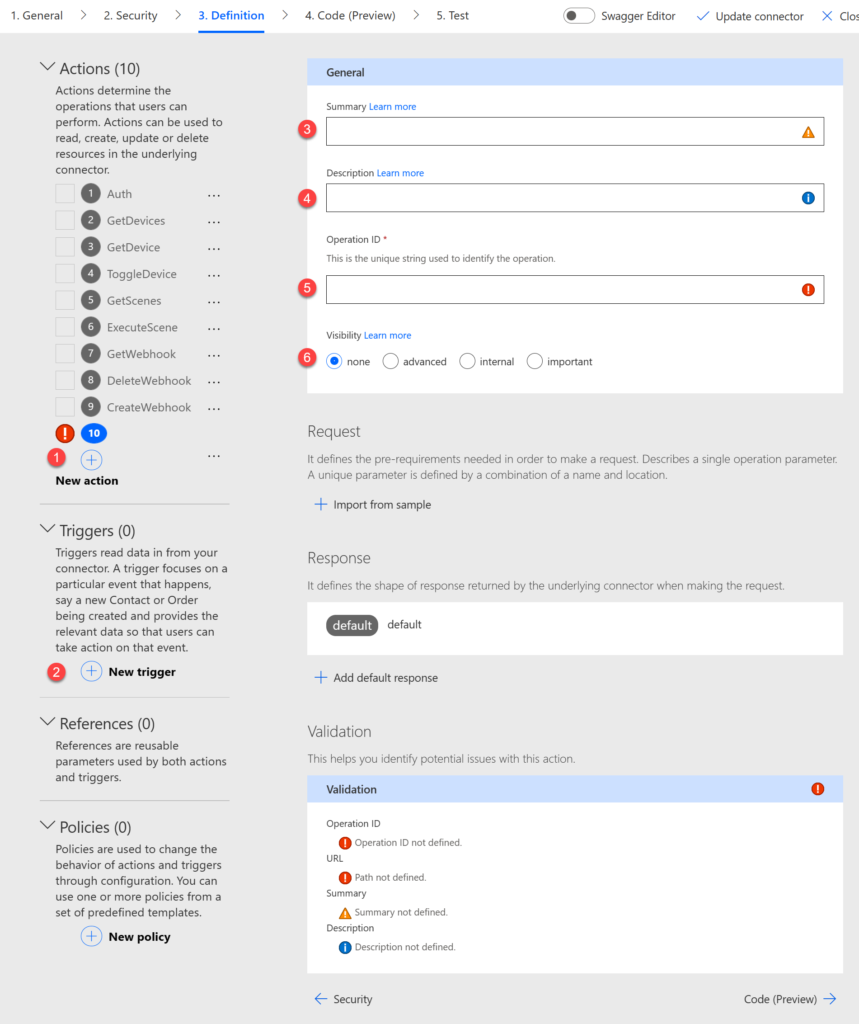
- Add and define all actions
- Add and define all triggers
For each action/ trigger define: - Summary – it will be used as a label in action’s header and on the list of available actions (Learn more).
- Description – this will be shown below the action’s name in the list of available actions, as well as under the info icon next to action’s name in header (Learn more).
- Operation ID – used internally, by the connector definition.
- Visibility – depending on the chosen one, action will display differently in the list of actions (Learn more):
- none – regular appearance;
- advanced – visible after user clicks “See more” on the list of actions;
- internal – not visible to users;
- important – visible as a first action on the list of actions.
Defining request/ response
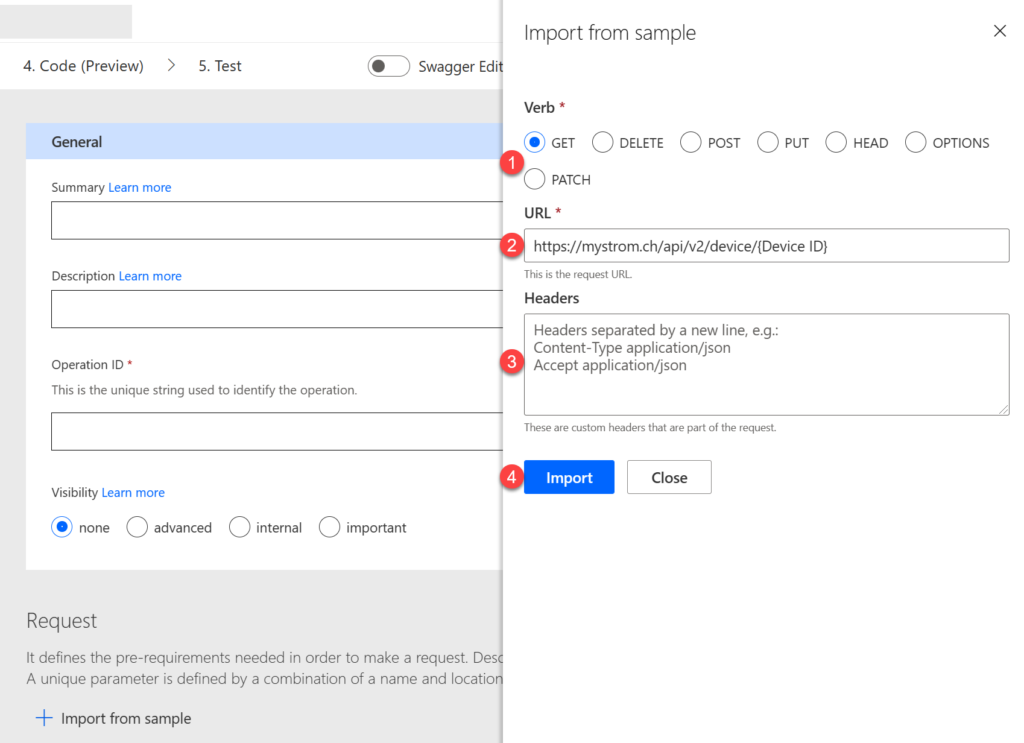
- Choose operation type;
- Provide URL. If URL contains parameters, surround them with curly brackets, eg. {PARAM};
- Define headers and body (JSON);
- Click import.
Important! For the response – do not define response schema for the “default” response type. But, don’t leave it empty. If API returns dynamic response, makers must use Parse JSON action to handle it, however no empty responses/ actions are allowed.
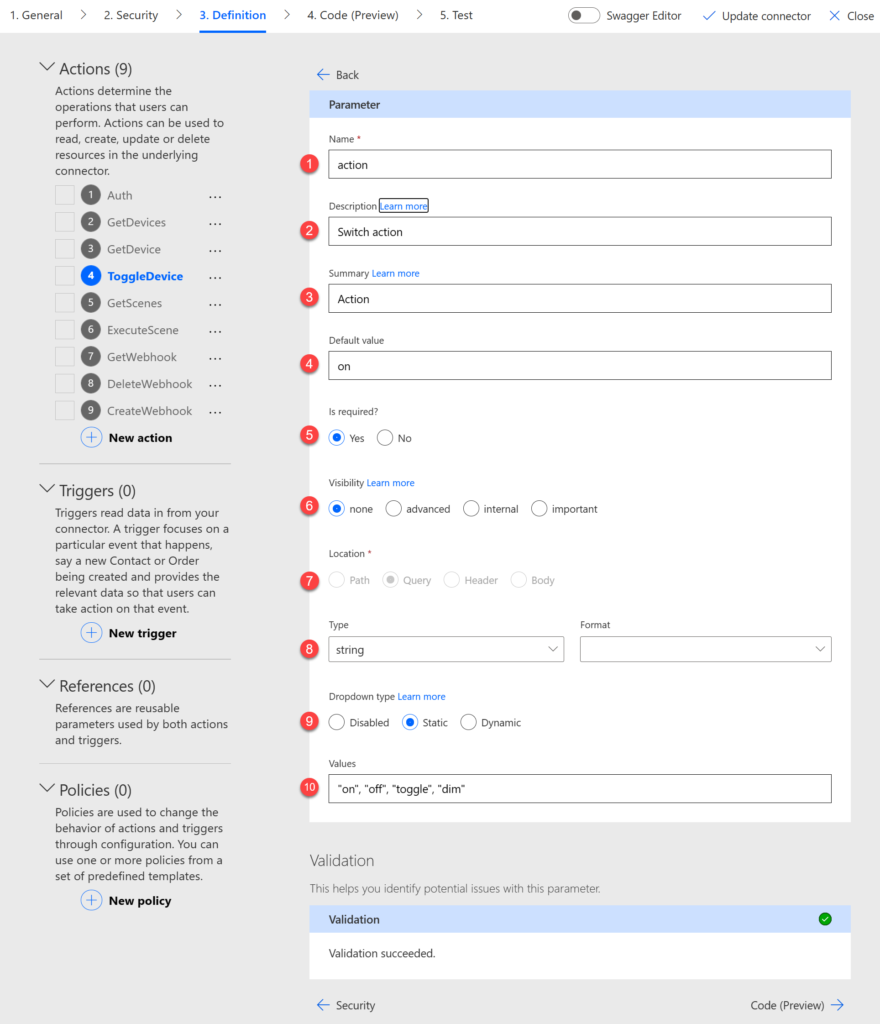
For each parameter you will have in request/ response:
- Name – used internally, not visible to end user;
- Description – displayed inside a field and as a description in a list of dynamic outputs (Learn more);
- Summary – displayed as a label above a field, also in a list of dynamic outputs (Learn more);
- Default value – no need to explain 😉
- Is required – whether field requires contents or not;
- Visibility – the same as for action (Learn more);
- Location – where the parameter is present in the request/ response data;
- Type and format – define type and format of data;
- Dropdown type – if field should allow to insert any value (Disabled) or should let user to choose from a static or dynamic set of values (Learn more);
- List of static values or dynamic dropdown configuration.
Important! Try to define as much information as possible. At least be sure to define Summary for each parameter.
Code
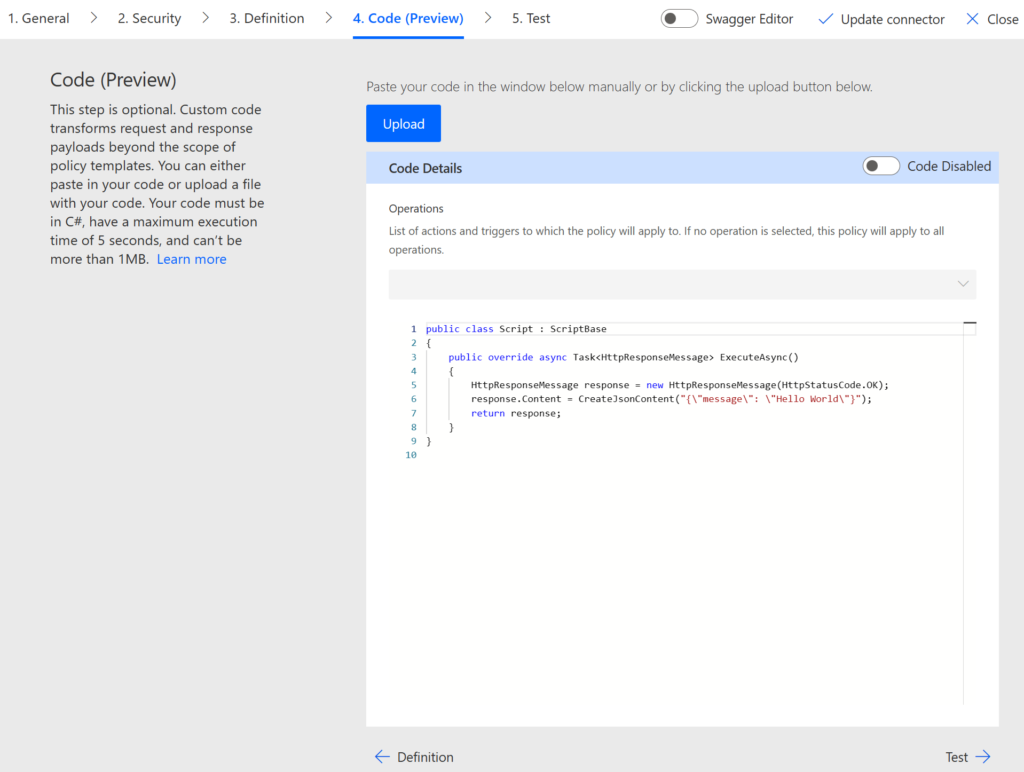
Here you can write/ upload additional code written in C# if endpoints require some additional manipulation before data is transferred to cloud flow or from it.
Test
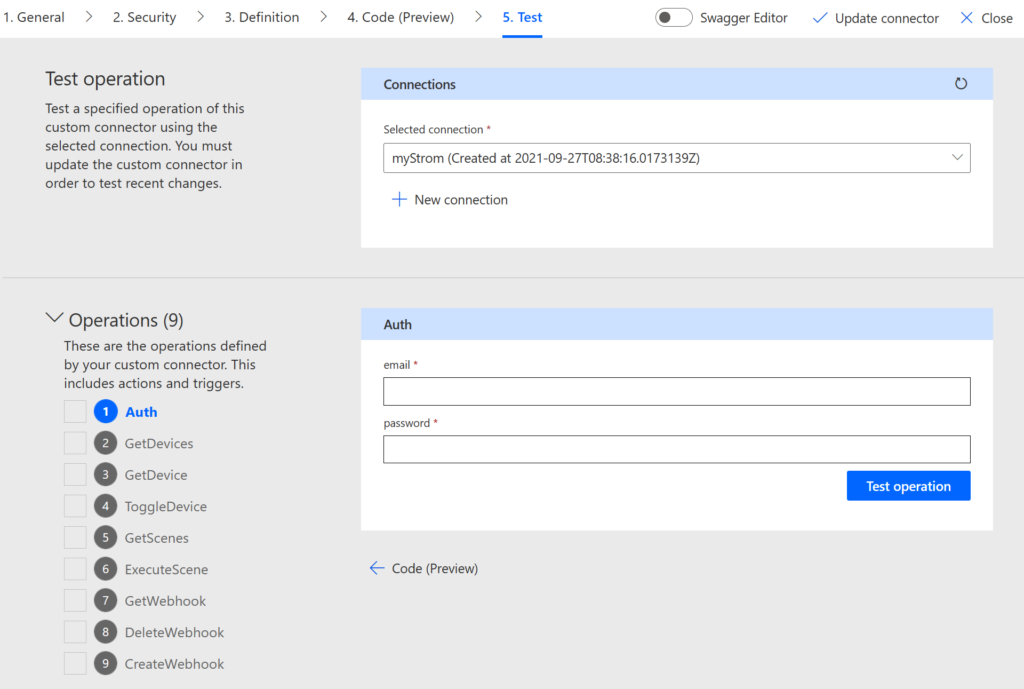
You need to execute every trigger and action you have defined. Each must end up successfully.
Important! After all methods are executed successfully, do a screenshot as a proof for verification.
2. Test custom connector
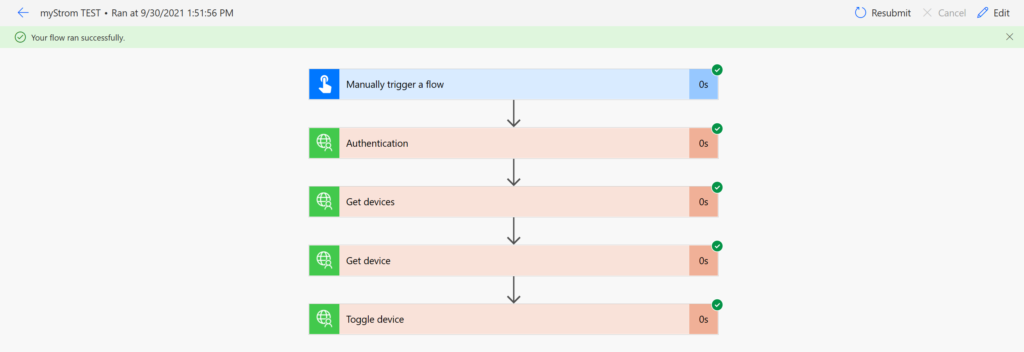
Now you have to create a test Cloud flow, that contains at least 3 actions (and a trigger if defined) from your custom connector.
Important! After you build it, execute and make screenshots showing that the flow has ran successfully. You can expand the actions.
3. Install Microsoft Power Platform Connectors CLI
Go to this URL: https://docs.microsoft.com/en-us/connectors/custom-connectors/paconn-cli to download and install Power Platform Connector CLI.
4. Download your custom connector
Follow these steps: https://docs.microsoft.com/en-us/connectors/custom-connectors/certification-submission#step-4-prepare-the-connector-artifacts to download your custom connector. This you need to do in two steps:
- In CMD console navigate to a directory where you want your connector to be downloaded.
- Type
paconn loginto login. - Type
paconn downloadto download chosen connector from a selected environment.
5. Tweak your connector
Walk through the step no. 3 – Add metadata from this link: https://docs.microsoft.com/en-us/connectors/custom-connectors/certification-submission#step-3-add-metadata. You need to complete information inside apiProperties.json file and apiDefinition.swagger.json.
Also, for every parameter that is defined inside a request URL, add "x-ms-url-encoding": "single" (or double, learn more), to define how values should be escaped. This is required.
Important! Remove all empty properties from your connector’s definition. Also, remove all empty responses and actions. Replace/ remove all unicode characters.
6. Validate your connector

In console, navigate to the location where you have apiDefinition.swagger.json file saved. Then type: paconn validate --api-def apiDefinition.swagger.json. Review and fix all errors! Valdiation must be truly successful (Learn more).
Important! Once validation is successful, make a screenshot. This will be a third proof that your connector is valid.
7. Add Readme.md file
This is the last required file. You need to create readme file, following existing templates (Learn more). I am using the one from github, present here: https://github.com/microsoft/PowerPlatformConnectors/blob/dev/templates/readme.md.
8. Make a fork on Microsoft’s github
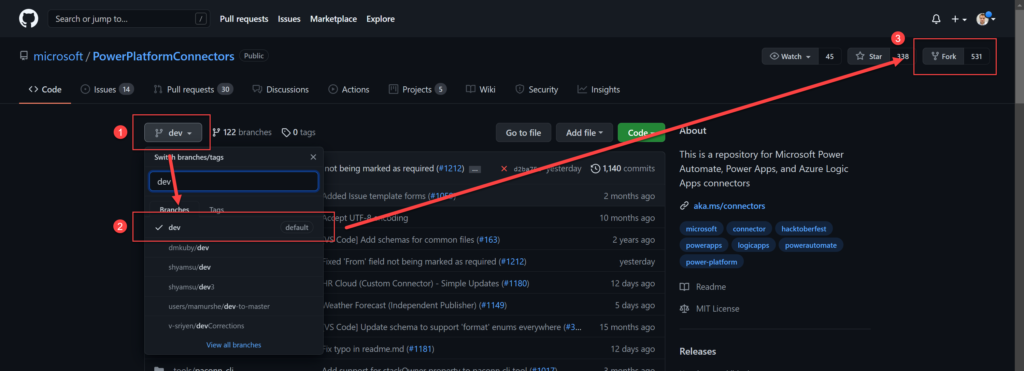
Go to https://github.com/microsoft/PowerPlatformConnectors and make a fork inside a dev branch. This will create your local version of the repository, under your account.
9. Open Visual Studio Code and prepare local repository
Now I am using VS Code, you can use Github Kraken or any other github client. What you need to do now, is to clone the repository (that one you forked, from your Github), to your local machine, then create a new branch for your connector (optional) and finally, add all files and create pull request to Microsoft’s dev branch. Ready? Ok. Oh, first install Github addon in your VS Code 🙂
- Press F1 and type
git: cloneand type paste URL of your forked repository from github. - Select location where you want it to be cloned.
- After cloning, open it as a new workspace in VS Code.
- Now Press F1 and type
git: create branch, select repository. - Now create new folder under “independent-publisher-connectors” folder with a name of your connector and copy there three files:
- apiDefinition.swagger.json
- apiProperties.json
- readme.md
Important! Be sure that in your commit there are only the above three files!

- Now navigate to source control (Ctrl+Shift+G).
- Type in commit summary – if this is the last commit before pull request, it should follow the pattern: “YOUR CONNECTOR NAME” (Independent Publisher).
- Click “Commit”.
- Then click to “Sync changes” 😉
10. Create Pull Request
Now create pull request.
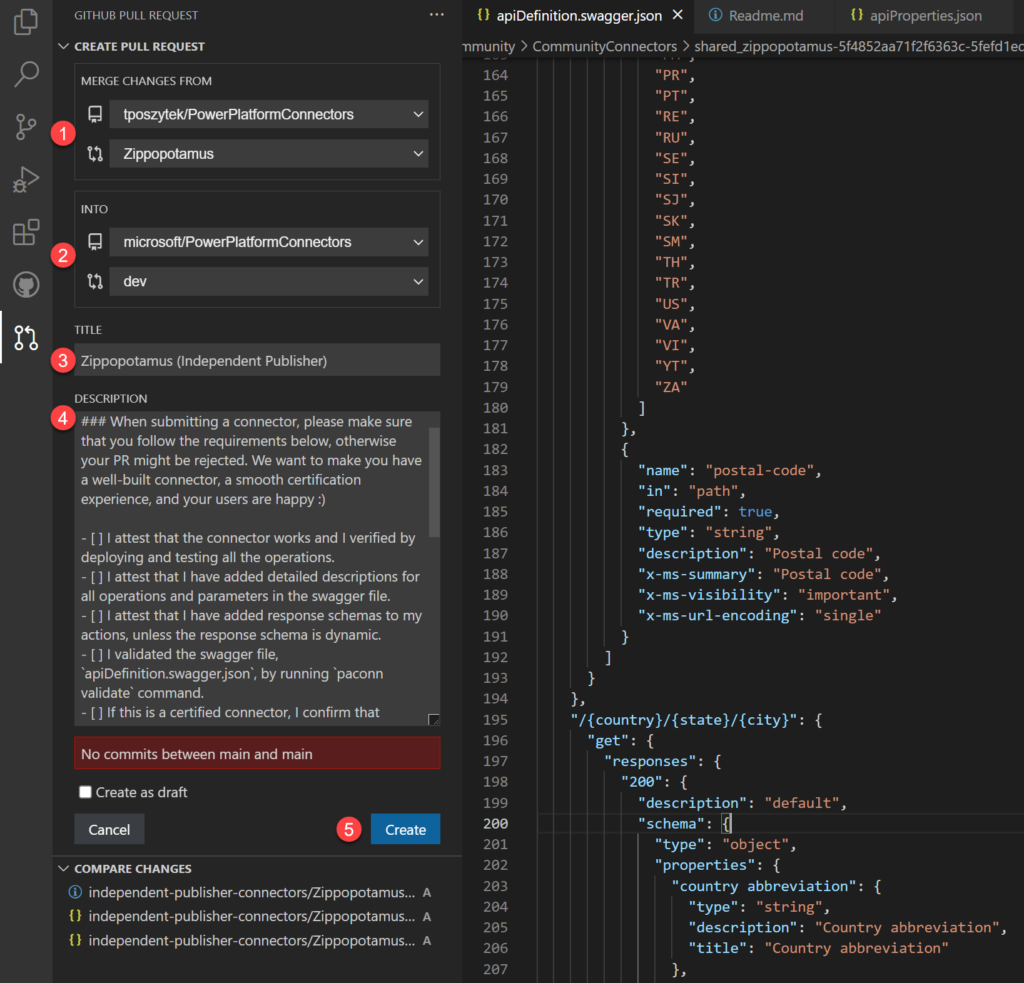
- Be sure you are making pull request from your repository and the right branch;
- Be sure you are doing pull request to a Microsoft’s dev branch;
- Name the request as “YOUR CONNECTOR NAME” (Independent Publisher).
- Tick mark all checkboxes. Before doing that read them of course to see if your publisher is compliant. Also, provide links to 3 screenshots as a proof it is working. Images can be hosted on your blog, or elsewhere publicly. Learn more how to attach image using markdown language.
- Once you’re done – click “Create” – this will begin the certification process.
And that’s basically it. Now you need to wait for a contact from Independent Publisher connectors program. If there are any issues, you’ll be asked to remove them before making another commit and pull request.
Good luck!


