Dynamic repeating section in Nintex Forms – how to
Table of contents:
My last project required creation of a dynamic list of approvers for the approval process (a coincidence? ), based on a location and volume threshold. And some other parameters, but this is not a case. At first I naturally thought about a list, that would hold such mappings for me. Then I thought to query that list within a workflow, using filtering to gather only a specific subset and then, using a state machine, to go through and assign tasks.
But there was a catch! Customer expected, that the form should allow to display that list of dynamically gathered approvers and then to show how each one expressed approval. And with the possibility to add or remove existing ones!
[tds_note] Need help in customizing your Nintex Forms? Contact me![/tds_note]
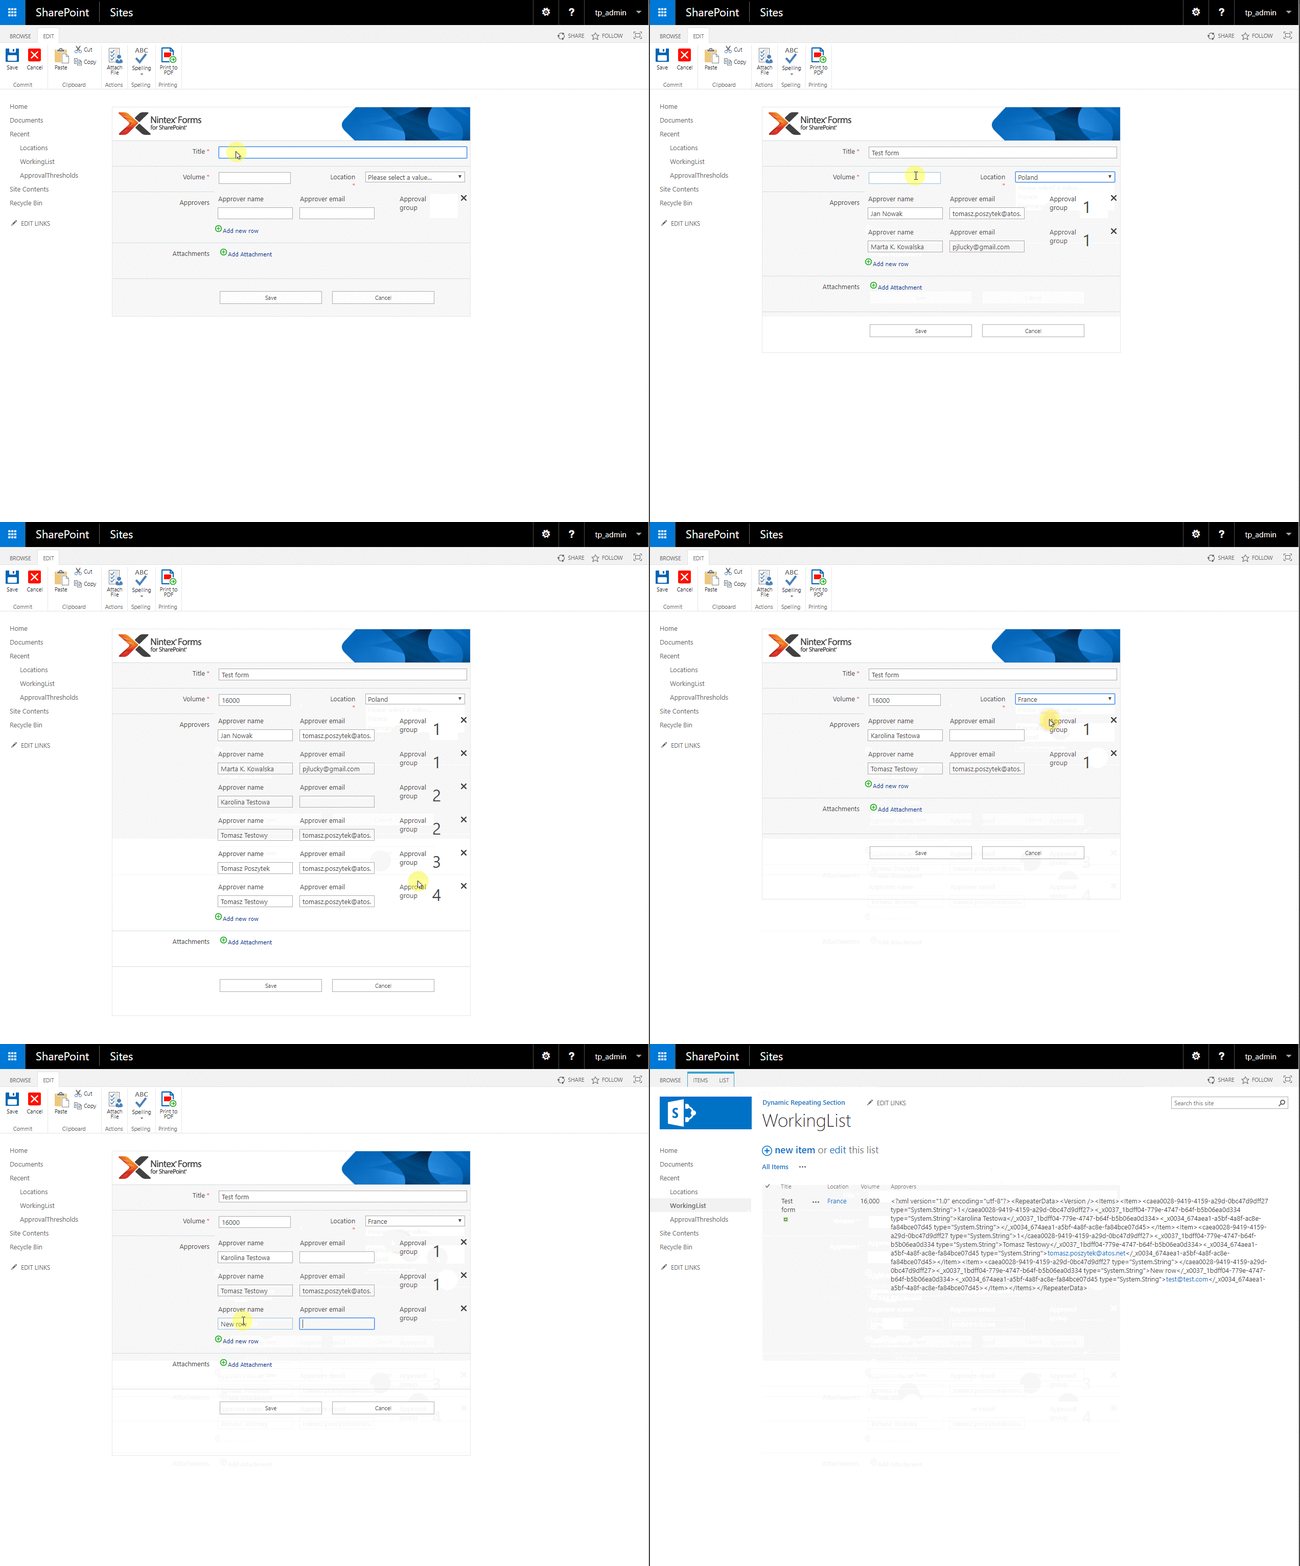
Naturally, I decided to use the Repeating Section control, but I didn’t know how to fill it dynamically. I managed to do that however, and the results look like this:
And the source list for data lookups:
How such dynamic repeating section can be made?
Step by step. Let’s begin!
The data structure
- Locations (just a simple list with title)
- ApprovalThresholds – a list built of the following fields:
- Title
- Approver (person field, many users allowed)
- Location (single lookup)
- Threshold (number)
- OrderNo (number, in my case it was used to identify a group to which specific user belongs)
- WorkingList (it was called differently, but for the demo let’s stay with this name )
- Title
- Location (single lookup)
- Volume (number)
- Approvers (multiline text field, plain text)
The form
Then I created a form for the WorkingList list. With some enchantments of course:
- Volume field was given a JavaScript variable name: var_Volume;
- Location field was given a JavaScript variable name: var_Location;
- And then I deleted the default “Approvers” field, the textarea, and replaced it with a repeating section:
The repeating section has added a CSS class “approvers”:
[tds_info] This is a key point here. The class name is the only way for the script to reach the control and then its contents.[/tds_info]
It is built of three input fields:
- Approver name – is given a CSS class: approversApprover
- Approver email – is given a CSS class: approversApproverEmail
- Approval group – is given a CSS class: approversOrderNo
There are also two checkboxes, one is having a JavaScript variable name: var_IsEditMode, the other var_IsNewMode, to pass information to the script how to behave, having set the “Default value” to “Expression”:
And basically that’s it for the form. All the magic is habdled by a jQuery script.
The script
Script is doing the following things:
- It binds change and blur listeners to the Volume and Location fields;
- It defines function that is triggered by the listeners events;
- It adds dynamic controls to the repeating section once it is in the edit mode.
- It also allows to hide or leave untouched controls for the repeating section (hideNativeRepeatingSectionControlls variable)
AD. 1 – listeners and bindings
var clientContext = new SP.ClientContext();
var siteurl = _spPageContextInfo.webAbsoluteUrl;
var hideNativeRepeatingSectionControlls = 0;


NWF$(document).ready(function () {

    //hide "add row" link in repeating section
    if (hideNativeRepeatingSectionControlls) NWF$(".approvers").find('.nf-repeater-addrow').css("visibility", "hidden");

    //trigger if location, CapitalExp or Volume is changed - recalculate list of Approvers
    NWF$("#" + var_Location).change(function () { retrieveApprovers(); });
    NWF$("#" + var_Volume).blur(function () { retrieveApprovers(); });

    if (NWF$("#" + var_IsEditMode).prop("checked")) redrawRepeatingTableEditMode();
});
AD. 2- function handling the changes
function retrieveApprovers() {

    var oList = clientContext.get_web().get_lists().getByTitle('ApprovalThresholds');

    var camlQuery = new SP.CamlQuery();
    var locationArr = NWF$("#" + var_Location).val().split(";#");
    var location = locationArr[1];
    var locationCaml = '<Eq><FieldRef Name="Location" /><Value Type="LookupMulti">' + location + '</Value></Eq>';
    var volume = NWF$("#" + var_Volume).val().replace(/[\,]/gi, "");

    if (!volume) volume= 0;

    camlQuery.set_viewXml('<View><Query><Where><And>' + locationCaml +
        '<Leq><FieldRef Name="Threshold" /><Value Type="Number">' + volume+ '</Value></Leq>' +
        '</And></Where>' +
        '<OrderBy><FieldRef Name="Title"/><FieldRef Name="GroupOrderNo"/></OrderBy></Query></View>');

    this.collListItem = oList.getItems(camlQuery);

    clientContext.load(collListItem);

    clientContext.executeQueryAsync(
        Function.createDelegate(this, this.onQuerySucceeded),
        Function.createDelegate(this, this.onQueryFailed)
    );
}
What id does, is gathering information from the form and construction of a CALM query, that it sends to SharePoint to get a list of approvers. If it succeeds it triggers the “onQuerySucceeded” function. What that function does is making a loop through each returned row.
Then, for each approver (as there may be more than one) it calls SharePoint endpoint for additional information (like login or email):
function onQuerySucceeded(sender, args) {
    // Redraw the existing table, remove everything what exists, leave fresh instance
    redrawRepeatingTable();

    var listItemEnumerator = collListItem.getEnumerator();

    while (listItemEnumerator.moveNext()) {
        var oListItem = listItemEnumerator.get_current();

        var approvers = oListItem.get_item('Approvers');
        var approvalOrder = oListItem.get_item('GroupOrderNo');

        NWF$(approvers).each(function (idx, obj) {
            var person = JSON.stringify(obj);
            person = JSON.parse(person);
            // get user's display name and ID
            var approverId = person.$1T_1;
            var approverName = person.$4K_1;
            var userData = "";

            // ask for users additional data
            NWF$.ajax({
                url: siteurl + "/_api/web/getuserbyid(" + approverId + ")",
                method: "GET",
                async: false,
                headers: { "Accept": "application/json; odata=verbose" },
                error: function (data) {
                    console.log("Error: " + data);
                }
Once it gets it (done) it pushes the information to the last, found row (.nf-repeater-row:last) using the ‘.approvers’ class (remember, it’s very important!) as the selector for the repeating field control.
[tds_council] If the “hideNativeRepeatingSectionControlls” is set to true, it also removes the “X” icon from the row, so that it cannot be deleted using the UI. It also covers it with the overlay, so the user won’t be able to change the values. You cannot set fields to be disabled or hidden using the CSS or Forms rules, as the hidden or disabled fields, for some reason, are not being taken into consideration during the form saving. So if you put a value into such field, that value won’t get saved to SharePoint.
Instead use “visibility:hidden” (rather than “display:none”) and a calculated field or overlay to make a field “disabled”.[/tds_council]
After it fills all the field in a row it simulates the “click” on the “add row” link that is underneath the repeating section, to create a new, blank row:
}).done(function (userData) {
            NWF$(".approvers .nf-repeater-row:last").find('.approversOrderNo input').val(approvalOrder);
            NWF$(".approvers .nf-repeater-row:last").find('.approversOrderNo input.nf-associated-control').attr("style", NWF$(".approvers .nf-repeater-row:last").find('.approversOrderNo input.nf-associated-control').attr("style") + "background-color: transparent !important;");

            NWF$(".approvers .nf-repeater-row:last").find('.approversApproverEmail input').val(userData.d.Email);
            NWF$(".approvers .nf-repeater-row:last").find('.approversApprover input').val(approverName);
            // remove image for row deletion
            if (hideNativeRepeatingSectionControlls) NWF$(".approvers .nf-repeater-row:last").find('.nf-repeater-deleterow-image').css("visibility", "hidden");

            // append overlay to avoid editting ;) fields must be enabled to allow proper save
            if (hideNativeRepeatingSectionControlls) NWF$(".approvers .nf-repeater-row:last").append('<div class="approverOverlay"></div>');

            //add next row
            NWF$(".approvers").find('a').click();
        });
    });
}
Then it removes the last, empty row, as it will always be added. It also adds, to every row generated by the process an additional class “toRemoveOnReload” so that the “redrawRepeatingTable()” function will know, what should be deleted, once the repeating section requires to be re-created.
    // remove last, empty row, as it is always empty
    NWF$(".approvers .nf-repeater-row:last").find('.nf-repeater-deleterow-image').click();

    // mark all additional rows as to be removed once control requires redraw:
    var addedRowsSuffixes = NWF$("input[name$='InternalRepeaterAddedRowSuffixes']").val().split(",");
    NWF$(addedRowsSuffixes).each(function (key, val) {
        NWF$("div[name='" + val + "undefined'").addClass("toRemoveOnReload");
    });

    return true;
}
The redrawRepeatingTable() function looks like this:
//function used to delete existing rows in repeating table leaving it as new
function redrawRepeatingTable() {
    //delete all existing repeating table rows, then build them again
    NWF$(".approvers .toRemoveOnReload").each(function () {
        NWF$(this).find('.nf-repeater-deleterow-image').click();
    });

    NWF$(".approvers .nf-repeater-row:last").find('.approversOrderNo input').val("").css("background-color", "rgb(248, 248, 248) !important");
    NWF$(".approvers .nf-repeater-row:last").find('.approversApprover input').val("");
    NWF$(".approvers .nf-repeater-row:last").find('.approversApproverEmail input').val("");
}
The last function, that is called redrawRepeatingTableEditMode() is used to inject suffixes and the “toRemoveOnReload” classes to the loaded repeating section control, generated when form is displayed in edit mode:
//function used to enchance table of approvers created in the edit mode:
function redrawRepeatingTableEditMode() {
    var suffix = 1;
    var suffixes = "";
    NWF$(".approvers .nf-repeater-row").each(function () {
        NWF$(this).find('.nf-repeater-deleterow-image').css("visibility", "hidden");
        // inject prefix into div's ID'
        if (suffix > 1) {
            NWF$(this).attr("id", suffix + "_" + NWF$(this).attr("id"));
            NWF$(this).attr("name", suffix + "_undefined");
            suffixes += suffix + "_,";
        }

        //increment prefix value
        suffix += 1;
    });

    // inject suffixes into the dedicated field
    NWF$(".approvers").find('.nf-repeater-addeddrow-suffixes').val(suffixes.substr(0, suffixes.length - 1));
    var addedRowsSuffixes = suffixes.split(",");
    NWF$(addedRowsSuffixes).each(function (key, val) {
        NWF$("div[name='" + val + "undefined'").addClass("toRemoveOnReload");
    });
}
[tds_note] Note that the Repeating Section is holding “suffixes” of each added row in a hidden field named “InternalRepeaterAddedRowSuffixes”. The string is built using the pattern: #_;#_;#_ where # is next number, counting from 1. You can also note, that each row in repeating section has a name, starting from the suffix and “undefined” token. That is another way you can iterate them.
What is interesting in the edit mode no suffixes are generated and the hidden field remains empty. This is why the script does it for it. [/tds_note]
Summary
This way of building dynamic repeating sections doesn’t need only to be used for gathering approvers. You can use it to get any kind of dynamic sets, like products, parts (depending on a chosen product) etc… I see a lot of possible use cases 🙂
I have attached my exported form (Nintex Forms 2016) and the JavaScript to the post. Enjoy!
[wpdm_package id=’717′]


raman
How to do a resizable repeater section in nintex form in classic mode.
Please help on this
Tomasz Poszytek
Sounds really challenging. I would say, only via jQuery.
raman
Please can you provide your above implemented code.
Tomasz Poszytek
The code is in the contents of the post.