How To: Simple newsletter solution using Microsoft Flow and SharePoint Online
Table of contents:
The article is a continuation of the post describing creation of a simple newsletter using SharePoint Designer 2013, written here and the other one using Nintex Workflow for Office 365, written here. This time I would like to show, how the similar solution can be made using Microsoft Flow and SharePoint Online.
Preparations
Just as it was for the SharePoint Designer solution and Nintex, the application is also built using two, custom SharePoint lists, in a dedicated Team Site:
- Newsletters, built of columns:
- Message title (Title, Single line of text, required)
- Message body (Body, multiline text, HTML formatting, required)
- Outbox, built of columns:
- Campaign name (Title, Single line of text, required)
- Recipients SP (Recipients_SP, People or Group, SP Groups allowed, multiple choice)
- Recipients Email (Recipients_EMAIL, multiline text, Plain text)
- Send date (SendDate, Date Time, required)
- Test delivery (TestDelivery, true/false)
- Sent (IsSent, true/false)
- Newsletter to be sent (Newsletter, Newsletters’ list lookup, required)
The workflow
Naturally, when doing the Microsoft Flow version of the solution, I was trying to relate on the Nintex solution. It was going quite ok, until I faced the issues. Be aware, that Microsoft Flow is in ongoing process of enchantments and development, so these limitations should be soon fixed (the release notes are here).
The limitations of Flow and solutions
- Problem: I wasn’t able to nest one for each loop under the other. So I wasn’t able to directly mirror the steps, where first I am gathering list of items to be sent and for each loop, I am gathering the recipients and then for each recipient I am sending an email.
Solution: I created a second Flow, that was being called from the parent Flow, which main purpose was to handle delivery of the emails. - Problem: Flow’s action to get SharePoint items does not support multi-valued People or Group fields. Also if the field allows to use both users and groups. Such field is not present in the list of returned values from SharePoint in such case.
Solution: I changed the field to a single choice and person only, decided to add additional emails in the Recipients_EMAIL field. - Problem: I wasn’t able to create a connection to Flow service, thus I wasn’t able to use the action “Start Flow” to trigger my second Flow. I still have no idea what was the problem.
Solution: I used the HTTP Request action, to call the other Flow using it’s public URL, and POST request. - Problem: You cannot create a variable anytime. If you want to use a variable, you have to initiate it. Initiation of a variable can only be done in the top-level of the Flow.
Solution: I did initiate the most important variables at the top-level and for the others, I used the “Compute” action and then work with its output.
What I liked?
Comparing Flow to Nintex for Office 365 is hard, it would be easier to compare it to Nintex Workflow Cloud (but that is planned for later). The most useful thing in Flow are the expressions (inline functions). In a single action, using the multiple expressions, I am able to process multiple transformations, whereas in Nintex for Office 365 I would need to use a separate action per each transformation.
The other thing was that the zoom-in and zoom-out using the mouse scroll + ctrl button works and allows me to have the full process visible.
How were the Flows built?
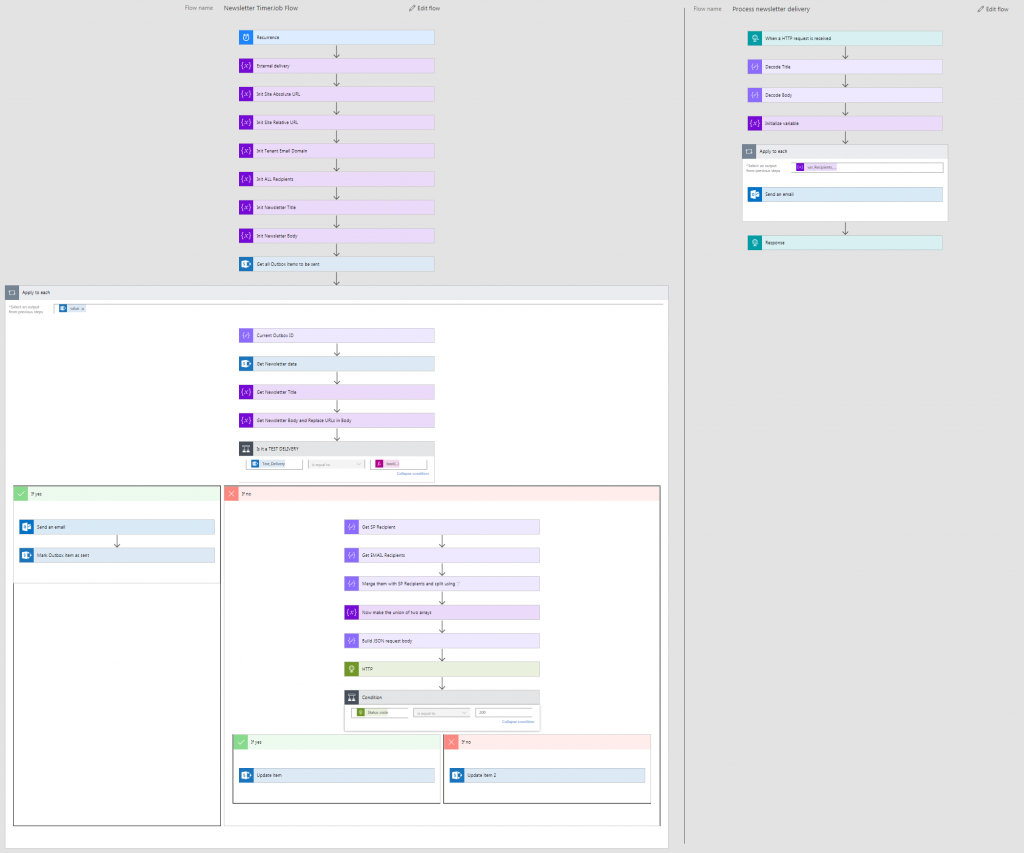
Below are the screen shots of two of the flows, that are used by my simple newsletter process. I will describe them in details below.
Newsletter TimerJob Flow
This is the main workflow. Its purpose is to trigger itself using a schedule (each hour) and in each run to check, if on the “Outbox” list there is any item, which is not yet sent (Is_Sent = no) and which “Delivery_On” date is less or equal current date.
- The first set of actions are focused on initiation of some crucial parameters – whether to send external emails, what is the tenant domain (to find external recipients), what are the Newsletter site’s absolute and relative URLs.
- Next it calls SharePoint, to get information about the list of all Outbox items that are waiting to be sent.
- For each item it gets the related Newsletter data: title, and body. Getting a “body” it ad-hoc transforms it relative URLs into absolute ones, using the following expressions:
replace(replace(body('Get_Newsletter_data')['Body'],concat('href="',variables('var_Site_Relative_URL_Str')), concat('href="',variables('var_Site_Absolute_URL_Str'))), concat('src="',variables('var_Site_Relative_URL_Str')), concat('src="',variables('var_Site_Absolute_URL_Str'))) - Then, if this is a test delivery, it simply send an email to the user who created the Outbox item and marks it as “Is_Sent” = yes.
- If this is not a test delivery, the process prepares a list of recipients, concatenating list of Recipients_SP with Recipients_EMAIL, then removing duplicates using the UNION expression:
union(outputs('Merge_them_with_SP_Recipients_and_split_using_'';'''), outputs('Merge_them_with_SP_Recipients_and_split_using_'';''')) - Then it creates a JSON string, containing Newsletter_ID, Outbox_ID, allow external recipients, list of recipients, newsletter’s title and body. The last two variables are escaped using the “encodeUriComponent” expression, so that the JSON is safe 🙂
- Now in the end it just uses the “HTTP” action to call the “Process newsletter delivery” flow to handle the delivery.
- Then it waits for the response and base on that if it’s equal 200 it marks the item as sent and not in other case.
Process newsletter delivery
The purpose of this workflow is to get the information from its endpoint, decode passed newsletter’s title and body (using the “decodeUriComponent” expression) and then for each recipient check whether it is external or internal, and whether the external recipients are allowed, and based on that – send an email. That’s it 🙂
The workflow’s endpoint REST schema is following:
{
    "type": "object",
    "properties": {
        "newsletterID": {
            "type": "number"
        },
        "outboxID": {
            "type": "number"
        },
        "external_allowed": {
            "type": "boolean"
        },
        "internal_domain": {
            "type": "string"
        },
        "title": {
            "type": "string"
        },
        "body": {
            "type": "string"
        },
        "recipients": {
            "type": "array",
            "items": {
                "type": "string"
            }
        }
    }
}
The evolution of the solution
Possibly in the nearest future this solution can be extended by:
- Allowing multiple selection of SP users and SP groups, as it can be done using SP Designer and Nintex;
- Embedding images directly in the newsletters body – thing not possible with Nintex, but feasible with Flow (read more here).
- Attachments – allowing multiple attachments to be sent along with the newsletter.
If you like the solution, please share your comments below! 🙂


Pawel
Thanks for a great article! Your tips helped me avoid 2 elementary problems in the very beginning (e.g. related to People/Group fields). In my case, Flow automatically added a “for each” loop, which was a nice surprise 🙂
Since I’m only beginning my journey with Office 365 bundle, I’ll definitely revisit your blog. Keep up with your great work!
Tomasz Poszytek
I’m really glad you found it useful. If you’ll look for any help don’t hesitate asking 🙂