How To: Simple newsletter solution using SharePoint Designer 2013
Table of contents:
Some longer time ago I was asked to think about a solution, allowing my client to notify his employes, about changes and news that were being published in the application built on SharePoint 2013. However, client did not want to use alerts, or to develop a dedicated application. No – the client wanted something like a newsletter, which would allow him to sent HTML formatted messages to all users (or SP Groups of users) who were working with the application, or to anyone having account in SharePoint (or to anyone beyond the organization).
As the client did not want to invest much in the solution, there were no money left in the budget to buy 3rd party tools or develop a dedicated application, I decided to use a tandem: OOB functionalities of SharePoint 2013 supported by a SharePoint Designer 2013 workflow, using capabilities of the SP Workflow 2013 platform (the Workflow Manager was configured in the farm).
Preparations
I decided to built the application using two, custom SharePoint lists, in a dedicated Team Site:
- Newsletters, built of columns:
- Message title (Title, Single line of text, required)
- Message body (Body, multiline text, HTML formatting, required)
- Outbox, built of columns:
- Campaign name (Title, Single line of text, required)
- Recipients SP (Recipients_SP, People or Group, SP Groups allowed, multiple choice)
- Recipients Email (Recipients_EMAIL, multiline text, Plain text)
- Send date (SendDate, Date Time, required)
- Test delivery (TestDelivery, true/false)
- Sent (IsSent, true/false)
- Newsletter to be sent (Newsletter, Newsletters’ list lookup, required)
During the analysis, regarding steps the workflow should execute, I realized, that possibly some string operations are going to be needed. For example – images and hyperlinks inserted in the “RichHTML” field, once item i saved, are being converted into relative paths. So to make it possible, to display them correctly in the e-mail clients, these paths have to be transformed into absolute paths (“Replace Substring in a String” action is required though). The other thing – because there was this need, to allow also sending the e-mail to the external users, I decided to concatenate internal e-mail addresses with the external (which are just a semicolon delimited text) – this required me to look for some sort of the “split” action – I decided to use set of actions from “Plumsail – String processing” that extends capabilities of SPD workflow with additional, string actions.
[tds_warning] Remember, that this solution cannot replace a true mass mail apps! It is supposed to only be used for notifying a small groups of recipients. The e-mails sent by this solutions are simply being processed by the same Exchange server your organization is using for its employees, so sending a lot of e-mails may be throttled or even blocked, to save server from being overloaded.[/tds_warning]
The workflow
The workflow’s main goal was simulation of a timerjob, that will trigger itself every specific number of minutes, will check the Outbox list, for not sent items, having the Send date older or equal current date and will start delivery of these messages. Simple 🙂
Due to fact, that the workflow was supposed to browse the whole Outbox list, moreover – will trigger every specific time, I decided to use the Site Workflow, as being more proper. Moreover, having in mind the need to be able, to execute REST calls to Newsletters list, as well, as to the UserInfo list I chose the SharePoint 2013 Workflow platform as the most suitable and useful.
So… how does my solution look, step by step? The workflow itself is quite large, it contains a lot of actions and operations. It’s exported, Visio image looks like below:
![]()
Step 1 – Initiation Form Parameters
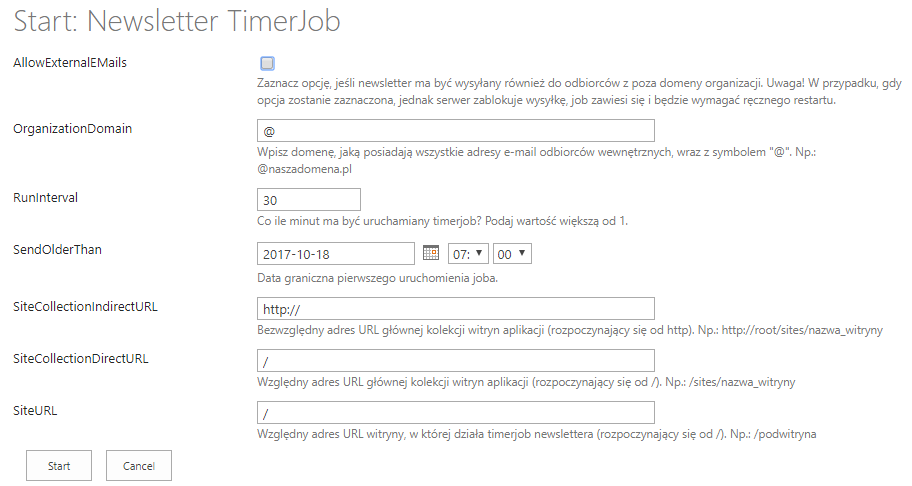
This is not required obviously. I decided to parameter my workflow as I wanted to make it more generic, being able to work on multiple tenants/ environments. Having all crucial parameters defined when being started. But this is just me. You can as well put them inside your workflow and have them fixed. The parameters are:
- AllowExternalEMails – generally, to allow or not sending e-mails to the external recipients.
- OrganizationDomain – internal domain – so that the workflow is able to distinguish internal mails from external.
- RunInterval – how often should the Outbox be checked for new items to be sent.
- SendOlderThan – date and time of the first run.
- SiteCollectionAbsoluteURL – absolute URL of the site collection. Ex.: http://root/sites/site.
- SiteCollectionRelativeURL – relative URL of the site collection (starting from /). Ex.: /sites/site.
- SiteURL – relative URL to the specific site (if not in the root site), where the application is hosted (starting from /). Ex.: /subsite.
Step 2 – timer
This is the first stage of the process. It addes the indicated “RunInterval” to the current date (starting from “SendOlderThan” value) and waits for this date to become. Once unpaused, executes the below steps. Workflow returns to this step each time all other steps are processed.
Step 3 – gathering list of items to be sent
The workflow, using the REST call, asks Outbox list to get all the items, having “Send date” older or equal current date and not being sent yet. To do that it uses the following call:
[%Parameter: SiteCollectionRelativeURL%][%Parameter: SiteURL%]/_api/web/Lists/GetbyTitle('Outbox')/items?$filter=((Send_date%20le%20datetime'[%Parameter: SendOlderThan%]')%20and%20(Sent%20eq%200))
Then, for each found item, it executes the below steps.
Step 4 – parameters and delivery options
Workflow obtains: Title, TestDelivery and Id of the related Newsletter. Then it reaches to the Newsletters’ list (again using REST call), to get: Title, and Body. Next, it process the Body:
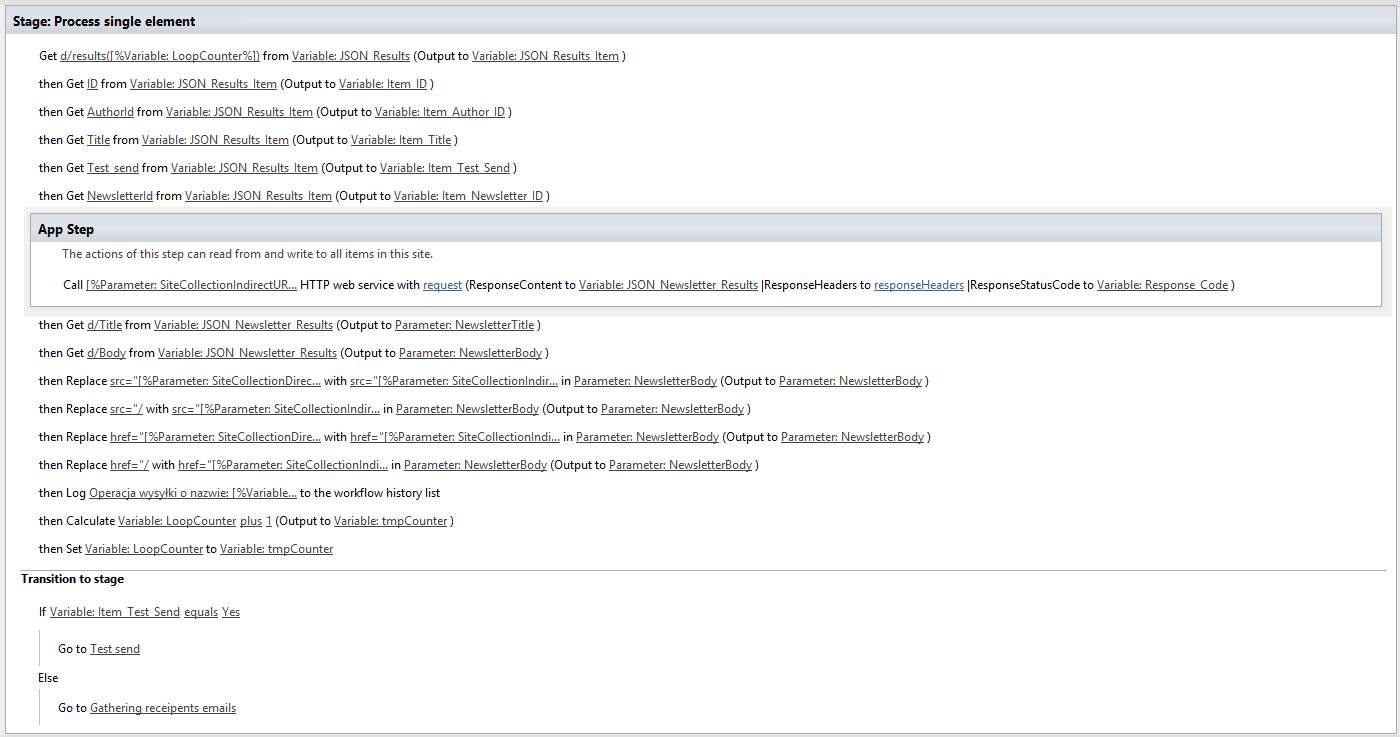
As I wrote in the beginning – the “RichHTML” field replaces paths to images and URLs from SharePoint with their relative paths. This has to be changed before delivering to the e-mail client, so the workflow has to replace the relative paths with the absolute paths. It is doing that using the “Replace Substring in a String” action.
Next, depending on whether the delivery is “TestDelivery” or not, it moves on to the proper stage.
Step 5 – test delivery
If the message is marked as a test delivery, the workflow prepares the message to be sent as it does for productive sent, however it is only sending it to the user who created the item in the Outbox. First, it calls the UserInfo list to get the author’s e-mail address.
After the message is sent, process marks it as “Sent”.
Step 6 – preparation for the productive delivery
It begins with the gathering of the recipients from the “Recipients_SP” field. Then, for each found record process is calling UserInfo list to get e-mail and the content type:
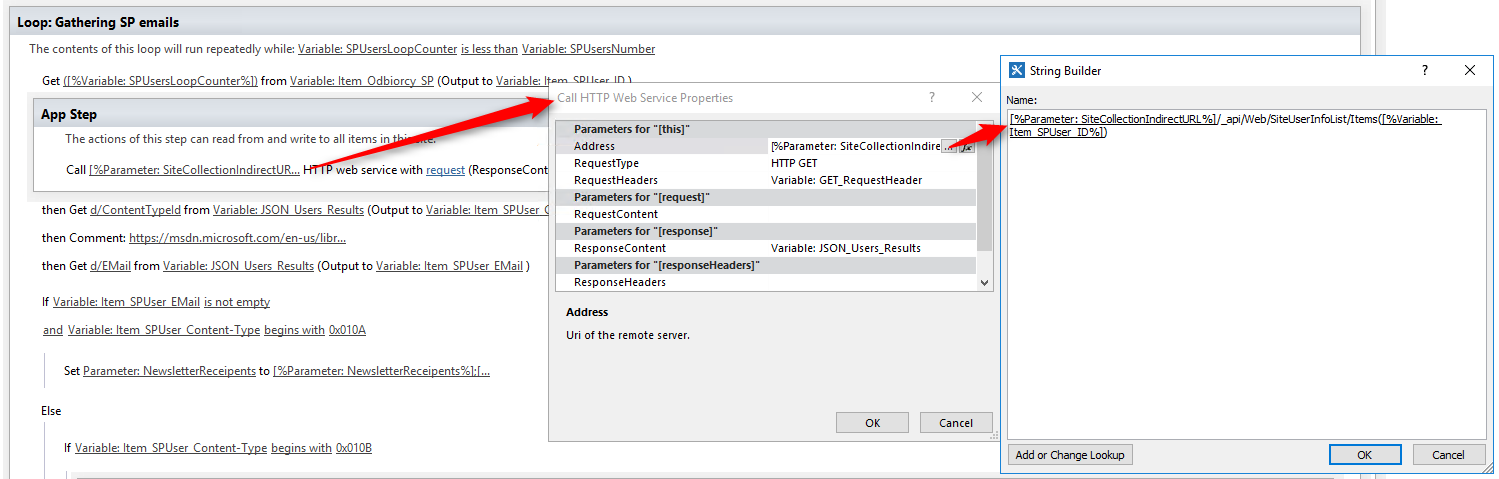
Next, it checks, if the obtained e-mail value is not empty and if the content type of the processed record corresponds to the “User” – it’s name has to begin with “0x010A” (source).
If, however, it’s name begins with “0x010B” then it means this is not a user, but the “SharePoint Group”. For such case the workflow asks REST API for the list of users from the group. Next, for each element from the group it again calls the REST API to get users’ e-mails addresses.
[tds_note] The workflow adds each found e-mail address to the string variable, delimiting one from the other using the “;” character .[/tds_note]
Lastly, it concatenates found e-mails with e-mails fro the “Recipients_EMAIL” field and then using the Plumsail’s “Split string” action it splits them and saves into Dictionary variable.
Step 7 – duplicates removal
To prevent single recipient from receiving the same message more than one (ex. he can be added as a single recipient, and as the member of a group), process is taking each e-mail address from the prepared, in the previous step, Dictionary and puts it into second one, checking before whether the second dictionary does already contain the specific value. If not – e-mail is added. If yes, it just moves to the next e-mail.
Step 8 – productive delivery
Finally, the process attempts the productive delivery. For each e-mail address from the Dictionary it does the same operation – prepares e-mail message using the “Email” action and sends it to the recipient. Doing that, it also checks if the recipient is allowed to receive the message – if this is an external recipient, but the setting says process cannot send to externals, it moves on to the next e-mail address.
After all e-mails are sent, process marks the item in the “Outbox” list as “IsSent” and moves to the step no. 1, so it pauses until next trigger date.
Launch!
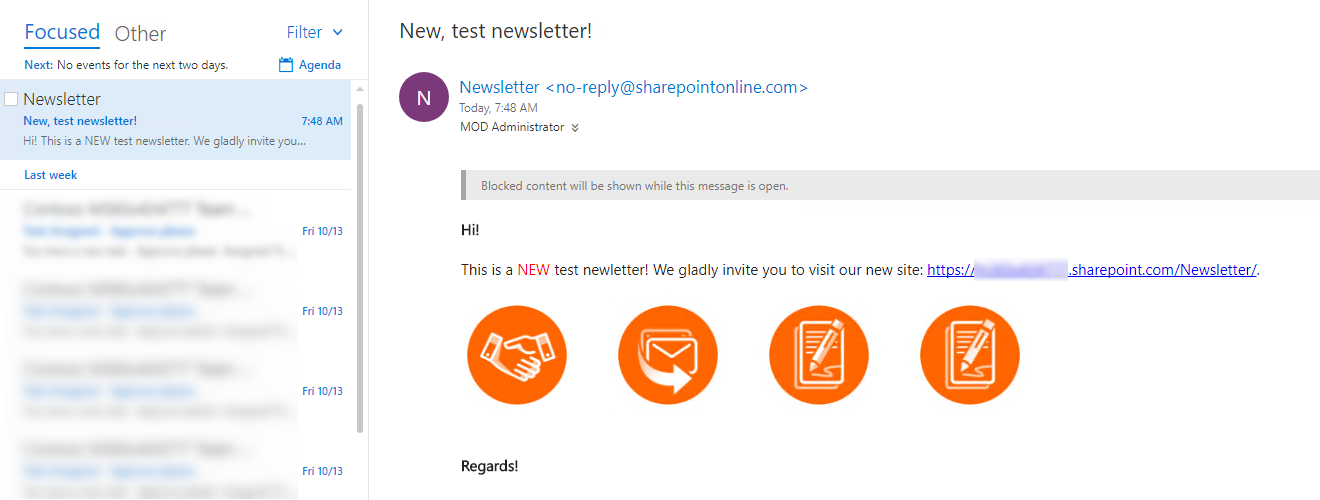
What you have to do now is the testing. Go to the “Site Contents” –> “Site workflows” and start that way prepared process:
After filling in the Initiation Form Parameters, and pressing the “Start” button, the workflow starts processing and looking for the Outbox items, that it will deliver right to your inbox:
[tds_warning] Be aware, that in SharePoint Online, there is no possibility to send e-mail messages from the SharePoint 2013 Workflow to external users! It can only be done using SharePoint 2010 Workflows.[/tds_warning]
Do you like my solution? Would you like to know about it or would you like to implement it in your premises/ tenant? Leave a note in comments or just contact me directly!