

Working with repeating section in Nintex RPA
Table of contents:
It’s been quite a long time since I last wrote anything around Nintex platform. Recently however I was involved in my first real project around Nintex RPA (formerly known as Foxtrot, RPA tool in Nintex suite, read its review here). One of the challenges I faced was how to get data out of a repeating section…
Nintex RPA works really good when targeting tables on web pages. But by “tables” I really mean a structure that is using <table> DOM elements, even better if it’s using <thead> and <tbody> tags too. For such objects RPA is able to simply iterate over the cells in a loop and get data of every single cell.
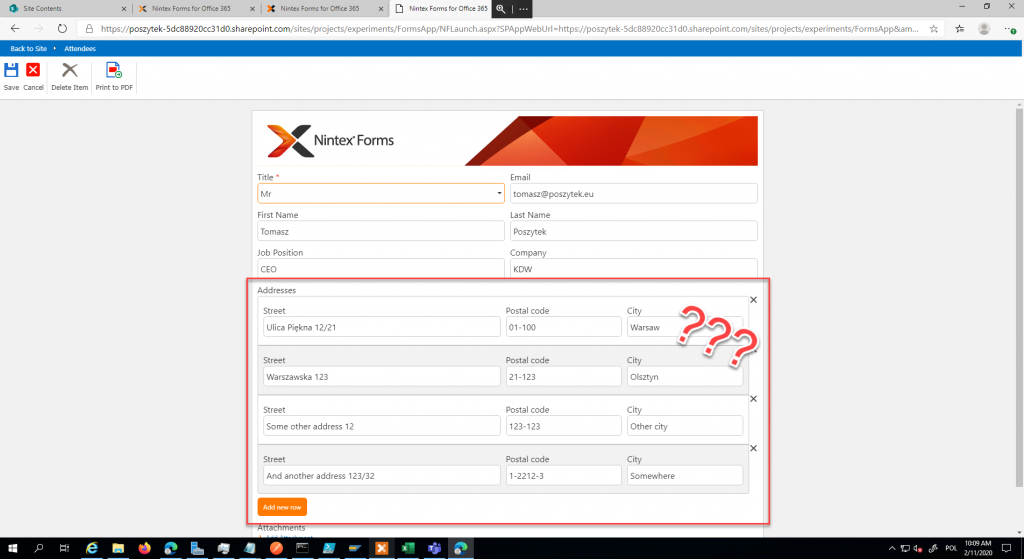
Unfortunately for Nintex Forms – repeating section when you view the code is not a regular table. It is a large group of DIVs. And for such – Nintex RPA is completely not capable of working with.
Solution
First thing I was advised by Jake Dennison, Process Automation Expert at Nintex was to avoid simply getting data directly from the web site’s interface. This is a good approach as long as the site is easy. But the more complex a form is, the better is to use more errorless techniques. One of them is usage of the Excel file with a table connected to a list’s view and actually querying that Excel file instead of looking up data on the web page.
That method eliminates the risk, that DOM element structure changed, or its ID/ Class and that Nintex RPA is no more able to find that element. In Excel table non of such things will ever happen 🙂
Ready? Let’s begin:
1. Prepare Excel with datasource
Important! To avoid guids as node names (eg. <_x0031_40e6374-db6a-4956-badb-6e4a605f45c9 type="System.String">) in XML structure be sure to set names of the fields inside your repeating sections: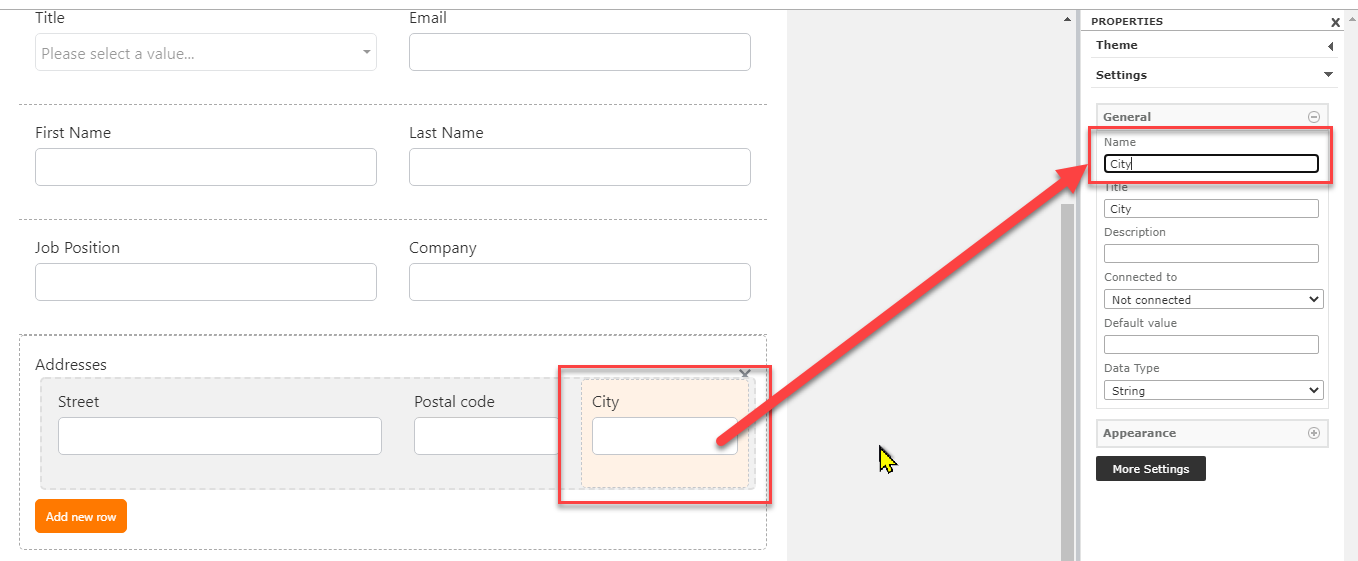
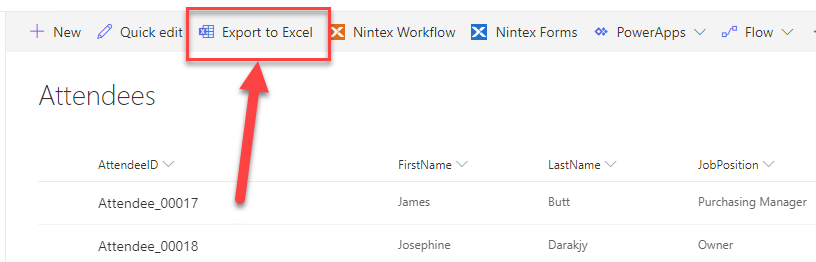
First prepare a list’s view that will contain all the columns (remember to add ID column – very useful later), including field storing XML of the repeating section, that you want to have an access to from Nintex RPA.
Once the view is ready, open it and hit the “Export to Excel” button on the list’s ribbon:
Open downloaded query.iqy file. Check your data and save it as xlsx file.
2. Opening Excel file in Nintex RPA
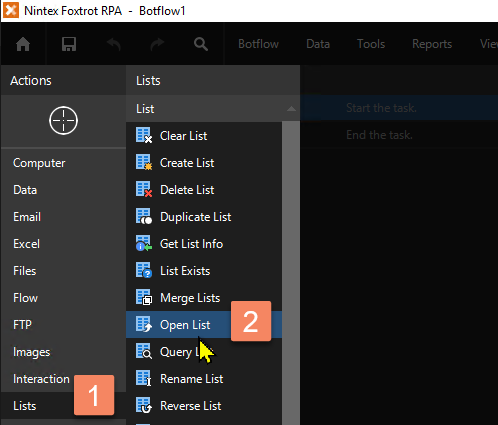
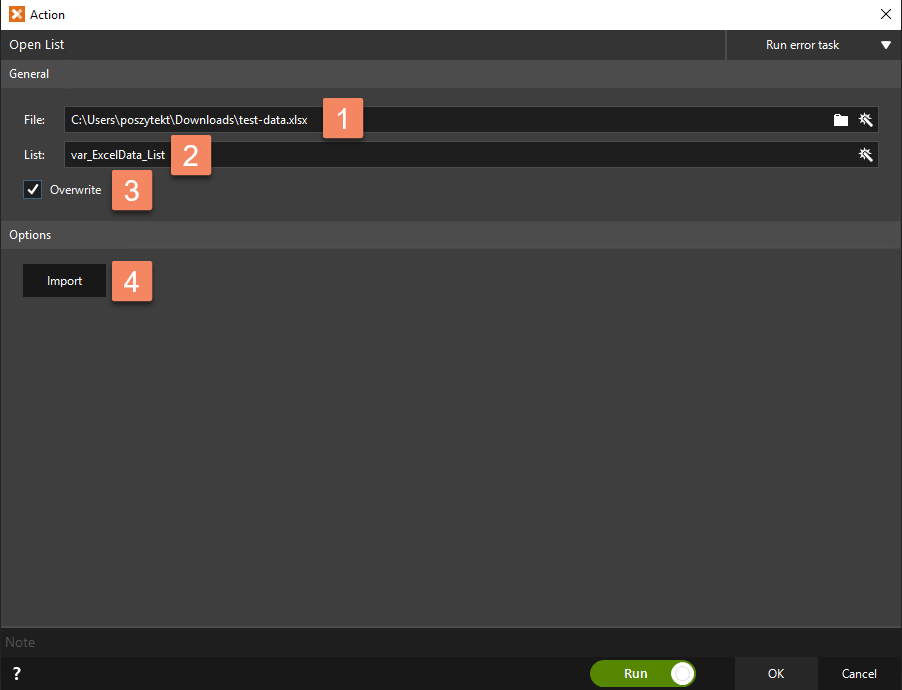
Go to designer and add action “Open List”:
Set the URL to your XLSX file (1), type in name of the list (or choose from existing, 2), set option to overwrite if exists (3) and lastly – hit “Import” (4) – this will open a wizard to set up how the list will look like:
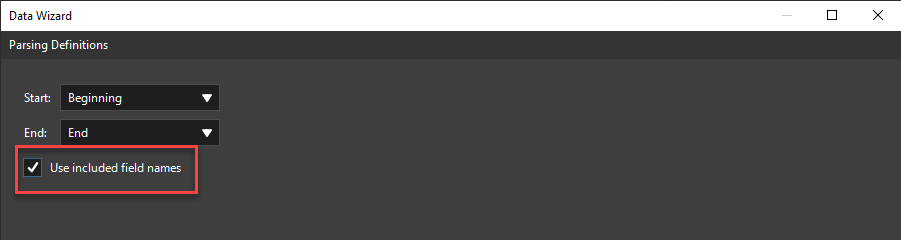
Go briefly through step no. 1. In second step set option: “Use included field names” – this will use table’s header names as list’s column names:
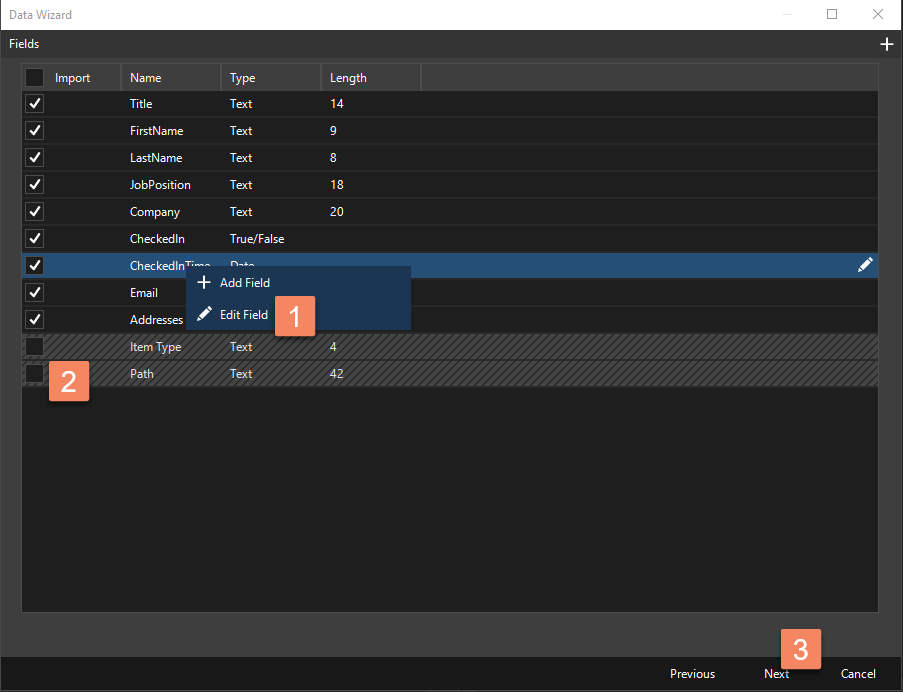
Next check what is going to be imported, change column names (1) if needed, remove specific columns from import (2) and once done – click “Next” (3):
Again “Next” on the next screen. Now you’re back at the main screen. Import is configured. You can now click “OK” and then check, how your list is populated:

3. Getting XML from Excel
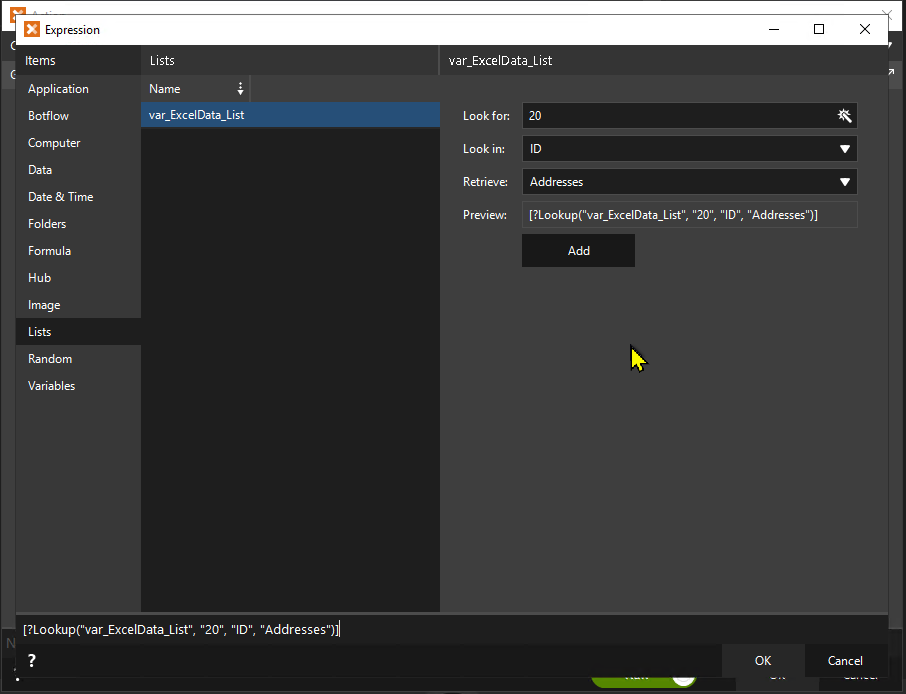
This step is fairly easy. You can either iterate over each row of the list or use function called LOOKUP. I am using LOOKUP because my bot is working in a context of a specific record. So next add action “Create Variable” (under “Data”) and configure it to get value from the XML field, for the record which ID is equal eg. 20: [?Lookup("var_ExcelData_List", "20", "ID", "Addresses")]
This way you will obtain the XML code. Now… how to turn it into a list?
4. Converting XML to list using PowerShell
The fastest and easiest way so far I found was to use PowerShell to generate CSV file from the XML code and then to import it back to the bot. This is how I did it.
First add action “PowerShell” (under “Advanced”)
Important! If you can’t see group of actions “Advanced” be sure they are allowed to use by administrator and your account has level “Expert” set: 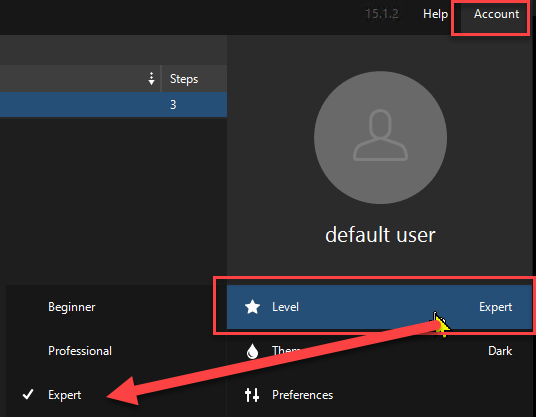
Next type the PowerShell script:
[xml]$xmlToXpath = '[%var_XMLData_Txt]'


$xmlToXpath.RepeaterData.Items.Item | Select-Object @(
@{l="street";e={$_.Street."#text"}},
@{l="postcode";e={$_.PostCode."#text"}},
@{l="city";e={$_.City."#text"}}) |

Export-Csv C:\Users\poszytekt\Documents\xml-to-csv.csv -NoTypeInformation -Delimiter:";" -Encoding:UTF8
First line is used to get XML code from Nintex RPA’s variable into PS variable. Next, PowerShell iterates over each row of the XML, getting values from specific nodes and finally exporting converted data as a CSV file semicolon delimited.
5. Opening converted CSV as a list
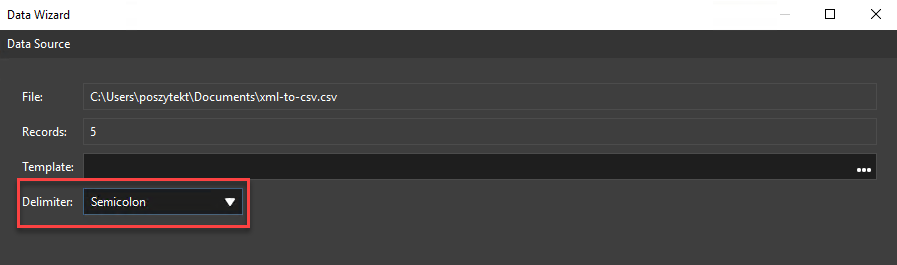
This step is similar to step no. 2. Again, use action “Open List” (under “Lists”) and point to the exported CSV file. Then type in list name, again set it to “Overwrite” it if exists and hit “Import”.
On the next screen be sure to use the same delimiter as the one in PowerShell. It is semicolon in my case:
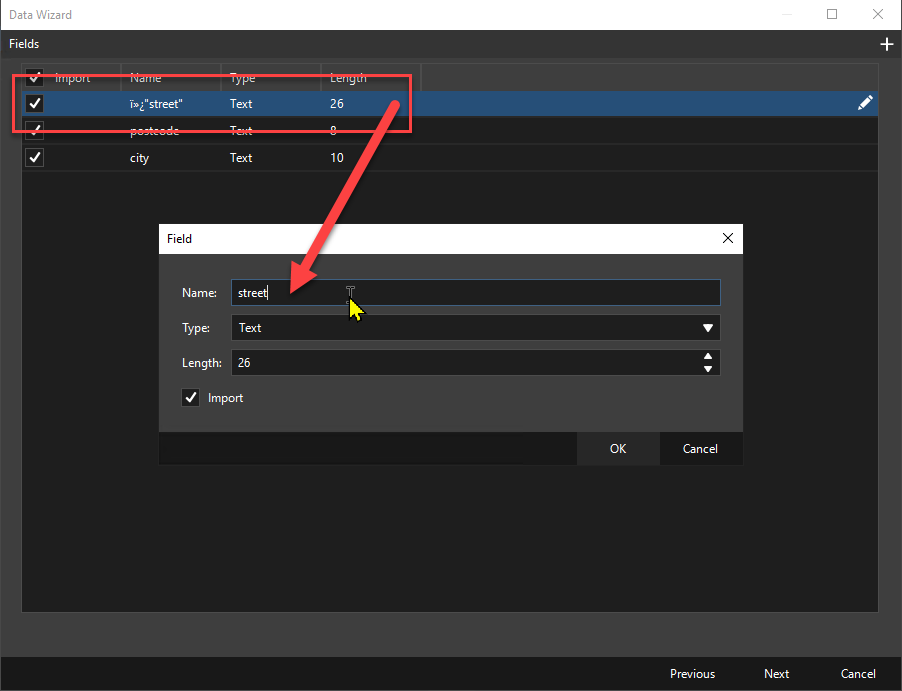
On the next screen again select “Use included field names” option to set headers for columns in the list.
And finally you’re on the screen where you can edit column names and remove/ add columns from the list:
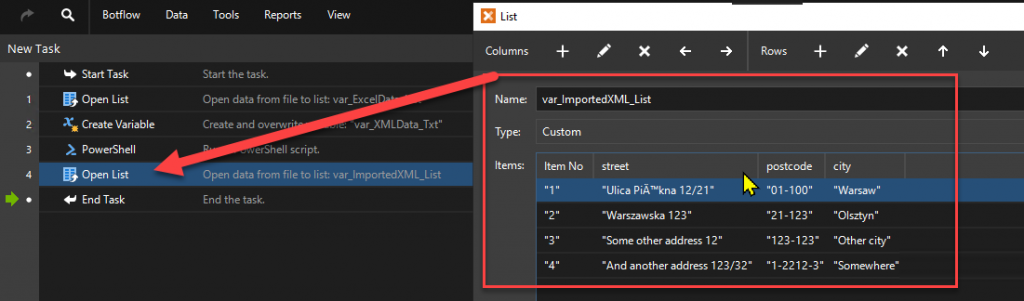
Once you’re done, hit “Next” and then “Next” again to be back on the main screen of the wizard. And click “OK”! Data from XML is now available for you to use as a list data:
I hope this will help you to save hours of work. If you have any questions leave me a comment!